Linux Sampler
The Linux Sampler is a stand-alone sampler as well as a DSSI, LV2, and Linux-native VST plugin. It uses the popular GigaStudio sample format, traditionally used in many of the de facto soft sampler applications. It is in the process of integrating the SF2 and SFZ formats, recent formats that have grown in popularity for their comparative simplicity.
Strengths [Weaknesses]
Dedicated
Linux Sampler is a dedicated application for opening sample banks and mapping them to MIDI. It does this well, and it has all the tools needed to get great results. This is a one-stop shop for your sampling needs.
Weaknesses [Strengths]
Big
There are several components that go into making Linux Sampler work, so it's a bit complex. If you do not have banks and banks of must-have .gig samples, this might be more effort than it's worth.
Install
Linux Sampler has several parts, so the compile options are many, but the download page of linuxsampler.org provides a good guide on how to proceed.
The source code for Linux Sampler consists of a minimum of two components:
- libgig to process
.gigfiles - linuxsampler the application
Optional are several more components. To compile it as a stand-alone application as well as a DSSI and LV2 (two free formats that Linux DAWs support), these are the components and the order for the compilation:
- libgig
- Linux Sampler
- liblscp and/or jlscp
- qsampler and/or JSampler
All are available from http://slackbuilds.org
SoundFont Support
Skip this section if you do not need Soundfont support in Linux Sampler. For synths using Soundfonts, see Fluidsynth and QSynth.
If you need SF2 and SFZ (SoundFont) support, then you must compile the latest version from the project's SVN code repository. Even though SlackBuilds.org may not offer the latest SVN versions, you can modify the SlackBuild and use it to compile and package your own SVN build. For example:
The latest version of Linux Sampler requires the latest version of libgig, so first download the latest code for libgig from the linuxsampler.org SVN repository:
$ svn co \
https://svn.linuxsampler.org/svn/libgig/trunk \
libgig-$(svn info \
https://svn.linuxsampler.org/svn/libgig/trunk | \
grep Revision | cut -f2 -d" ")
For better tracking, you are creating a new version number for the applications you are building. It seems a logical choice to use the latest revision posted to the SVN repository.
If you use sport or similar, then you probably already have the libgig SlackBuild script in your SlackBuilds tree. Otherwise, download it from SlackBuilds.org.
The code, as downloaded, does not have a build configuration script. You could create one, and then run the SlackBuild script, or you could modify the SlackBuild script to create one as a part of the build process. The latter choice is the “right” way to do it, since you could use and re-use such a dynamic script. It's possible to hack around doing the legwork by generating the necessary files manually, but if you do it the right way now, you'll probably never have to do it again, so here are the changes to the SlackBuild file in order to build a script that lasts.
Open the SlackBuild file in a text editor and change the VERSION:
VERSION="-SVN$(svn info \
https://svn.linuxsampler.org/svn/libgig/trunk | \
grep Revision | cut -f2 -d' ')"
Comment out the line that untars the source tarball, since there is no source tarball, and add a line that copies the SVN source to the temporary directory and changes directory into it:
## tar xvf $CWD/$PRGNAM-$VERSION.tar.bz2
# slackermedia changes:
cp -r $CWD/$PRGNAM-$VERSION $TMP
cd $PRGNAM-$VERSION
Add a line before the configuration step in the script to create a configure and Makefile:
automake -c makefile
configure \
(various config options)

make
make install --DESTDIR=$TMP
And finally, run the SlackBuild.
Once libgig has been installed, repeat this process for linuxsampler itself.
Usage
Linux Sampler is, technically, a “terminal application”; it runs as a background process whose job it is to open .gig banks and map them to MIDI. That offers a lot of flexibility to people who are building their own gear and want to embed a sampler, but for most artists it's not the easiest way to work a sampler.
As the download page of Linux Sampler says, the Qsampler and JSampler graphical frontends for Linux Sampler, are independent of the linuxsampler binary itself. Therefore, if you build the backend (libgig+linuxsampler) then you can choose to download and install Qsampler and its dependencies, or a different frontend, like JSampler and its dependencies, or both, or neither.
Both GUI frontends start Linux Sampler automatically upon launch, so the process for starting Linux Sampler is the same as any other synth:
- Start JACK (via the
jackdcommand or with QJackCtl) - Start Linux Sampler (by launching QSampler or JSampler)
- Make music!
JSampler (Fantasia)
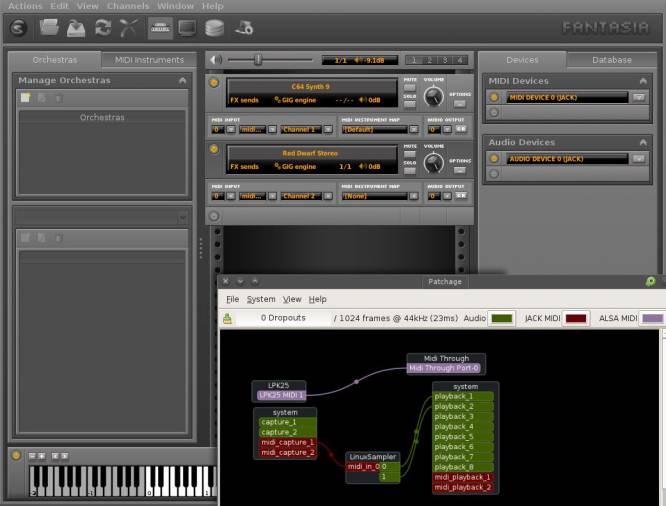
The Fantasia JSampler frontend is a Java application and has its own peculiar, and quite attractive, interface design. Its layout is intuitive if you have a solid understanding of how a traditional sampler system works.
The right panel of Fantasia is the Devices list. You must configure MIDI and Audio devices so that Linux Sampler declares itself to your computer's audio system (and shows up in your JACK patchbay).
You need at least one MIDI device so that you can send signals to Linux Sampler and at least one audio device so that you can hear the sound being output from Linux Sampler.
To create a MIDI interface to Linux Sampler:
- Click the round
Onbutton on the MIDI Devices bar. - Set the MIDI Driver to JACK in the dropdown menu in the upper right corner of the window.
- Click the Create button.
Now a MIDI device is listed in your device panel, but more importantly it is also listed in your JACK frontend (Patchage or QJackCtl).
To control Linux Sampler, connect the output of your MIDI controller to your System MIDI Thru, and then the output System Capture MIDI into the Linux Sampler MIDI input.
That routes the MIDI signal, but you still won't hear any sound.
Create an audio output device:
- Click the
Onbutton on the Audio Devices bar of the Devices panel. - Set the Driver to JACK.
- Click the Create button.
An audio device is listed in your device tree, but more importantly it is also listed in your JACK patchbay.
So that you can hear the output of Linux Sampler, use Patchage or QJackCtl to connect the output of the Linux Sampler audio to System Playback.
Now that the inputs and outputs of your sampler are set, you have only to define the instrument or instruments you want to use.
Each instrument takes up one “channel”. To load an instrument, you must create a new channel. Channels in Fantasia are represented as rack-mounted synths in the middle column of the window.
Create a new channel:
- Click the
Onicon on the rack unit or use Channel menu → New Channel. - When you add a new channel, there are no obvious options until you click some of the text on the rack unit. First, click the
GIG Enginelabel and select what engine you want to use. Depending on how you installed Linux Sampler, there may only be one choice:GIG Engine, and that's OK. - Next, click the Load Instrument label. This brings up a file chooser; find the
GIGorSF2orSFZfile you want to use as your sample bank. - Click on the Options button on the far right of the rack unit to route the channel.
- Set MIDI input to some valid MIDI channel. If unsure, set to
1. - Set the Audio out to your audio device.
Now you can trigger Linux Sampler with your MIDI controller (whether that's a USB Midi keyboard or a software controller or sequencer) and hear the output through your computer speakers (or through your DAW, depending on your own choice routing).
QSampler
The Qsampler frontend has the advantage of being a native Qt application, so it fits in well with Slackermedia's default KDE desktop. Its user interface is not quite as intuitive as JSampler, and in fact you might find Qsampler easier to use after you cut your teeth on the more intuitive JSampler.
The basic routing configuration of QSampler must be created as “devices” within the Linux Sampler framework. You need at least one audio device so that you can hear the sound being output from Linux Sampler and at least one MIDI device so that you can send signals to Linux Sampler.
Since none of that configuration would be of any use if you didn't have an instrument to control and hear, it's easiest and most pragmatic to create these devices in the same step as creating an instrument.
Each instrument takes up one “channel”. To load an instrument, you must create a new channel.
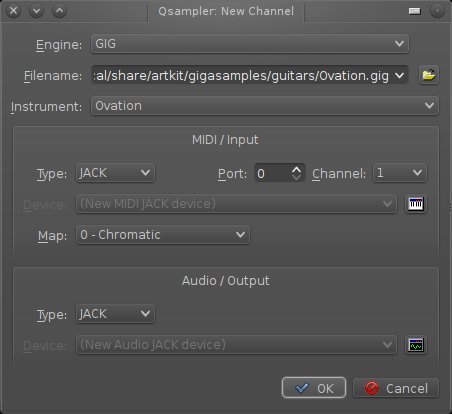
Create a Channel and Set Devices:
- Click the New Channel button in the top toolbar, or the Channel menu.
- In the New Channel configuration panel, select the sample bank to load into the channel you are creating. Many banks have unique patch sets within the bank, so choose the specific instrument as required.
- Set the MIDI driver to JACK.
- Set the MIDI channel to a valid MIDI channel. If unsure, set to
1. - Set the Audio driver to JACK.
Route the signals:
In your JACK patchbay (Patchage or QJackCtl), route your MIDI controller or DAW MIDI to the MIDI In of Linux Sampler. Route the Audio of Linux Sampler to System Playback.
Linux Sampler as a Plugin
JSampler and QSampler are just the stand-alone frontends to Linux Sampler. DAWs can use Linux Sampler as a plugin, meaning that a different (and invariably simpler, since the DAW is doing all the MIDI and audio the routing for you) frontend will be used.
Sessions
In both JSampler and QSampler, sessions should be saved so that settings are persistent. Keep your session files with the rest of your project files.
If using Linux Sampler as a plugin to a DAW, the sessions are managed by the DAW.
See Also
Fabla
Giada Loop Machine
Luppp
Fluidsynth
QSynth


