Milkytracker
MilkyTracker is an open source music application for creating .MOD and .XM module files. It attempts to recreate the module replay and user experience of the popular DOS program Fasttracker II, and even has some compatibility with Amiga ProTracker. It's an exemplary fast, lightweight, and effective music sequencing tool.
Trackers happen to be “retro” because they were popular decades ago and have not changed in design or function since, which may be charming to look at, but functionally this is significant, too. Milkytracker works the same today as it did in the 90s, promoting a workflow that produced some great electronic music. It works on low spec hardware, and opens the oldest of files.
Strengths [Weaknesses]
Lightweight
If you use old hardware but still want to make music, a lightweight music tracker is the tool to use. The tracker sequences whatever sample you give it, so you can create extremely high quality music without a substantial CPU workload. Milkytracker, for instance, runs on a Raspberry Pi without issue.
Efficient
Milkytracker is designed to be keyboard-driven during composition. Longtime tracker users can compose music as quickly as most people type into a word processor.
JACK Support
JACK is not necessary, but Milkytracker has the option of using it, if you want to add “outboard” software gear to your humble sequencer.
Sample Editor
In addition to being a great sequencer of samples, Milkytracker can also create and edit sample files.
Weaknesses [Strengths]
Trackerisms
If you have never used a music tracker, it can be difficult to get used to the workflow, and learning the interface can be tantamount to cryptography.
Install
Install Milkytracker from its Slackbuilds.org install script. If you want to include JACK support, prepend your build command with JACK=yes. For example:
bash-4.2# JACK=yes ./milkytracker.SlackBuild
Launching Milkytracker
You do not have to run JACK for Milkytracker to work.
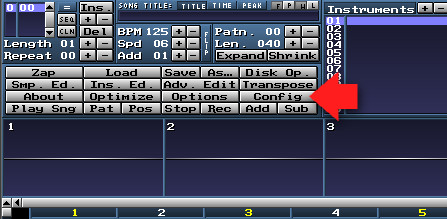
When you first launch Milkytracker, it is sized 640×480 with 8-point text. There's no reason for this aside from legacy defaults. To make your workspace larger, click the Config button in the top left cluster of controls.
The control panel switches to the config panel; click the Layouts tab on the left to choose the size of the Milkytracker window, and the Fonts tab to increase the font size as needed.
Click the OK button to accept your changes, and you'll be prompted to restart Milkytracker. Close the Milkytracker window an
d re-launch; your new settings have been applied. You can switch in and out of fullscreen mode in Milkytracker with Alt-Enter.
Making Music
As with any music software, the first thing you need to do to compose a song in Milkytracker is figure out what instruments you want to use. In Milkytracker, this takes place in two panels at the top: the Instruments panel and the Samples panel. Instruments contain samples, so assuming you're starting from scratch, build a simple instrument or two to start with.
To give your new instrument a name, double-click on the empty 01 slot in the Instrument panel.
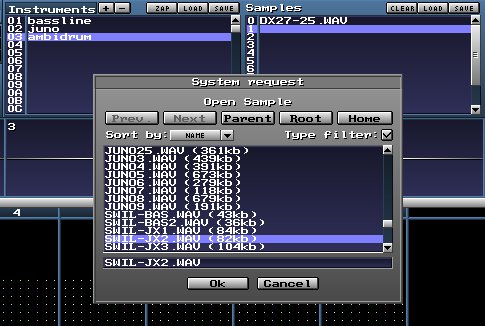
The actual sound that gets played is determined by the Sample panel. To load a sample into the currently active Instrument , click on an empty slot in the Samples panel and click the Load button at the top. Choose a sample from the menu that appears, and click OK to load the sample into place.
Samples should be in WAV, AIFF, or IFF format.
If you have no samples or just need more than what you do have, one of the best resources online is http://freesound.org.
You can also find some samples at http://slackermedia.ml/downloads.
In a pinch, you can also unarchive Hydrogen drumkits, sfz files, and other collections of sounds and raid them for samples.
Use ffmpeg or sox to convert files to WAV.
Keyboard Entry
The most immediate way to audition or play notes into a tracker is on your keyboard (the one you type on, not the chromatic one). As long as Instrument 01 and a valid Sample are highlight in the Instruments and Samples panels, you should hear sound when you press any of these keys on your keyboard:
- Keys Z through < cover C(4) through C(5), with the black keys mapped to the row immediately above (so, S and D as C# and D#, and so on).
- Keys Q through I cover C(5) through C(6) with the number keys acting as appropriate black keys.
The octaves are dynamically adjustable with the F1 to F8 keys.
Most trackers enter notes from the keyboard. It's part of the efficiency of using a tracker. However, there's a nice virtual chromatic keyboard included in Milkytracker that isn't just useful for playing in notes, but editing envelopes and adding effects, too. Bring up the Instrument Editor with the Ins. Ed. button in the top left control panel (it's located just above Channel 1 column, under the Load button and above the Optimize button).
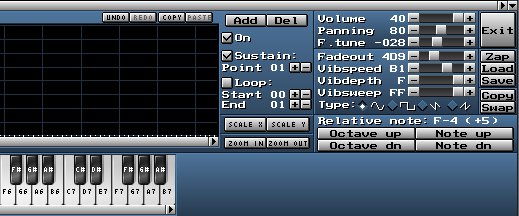
The instrument editor provides a small virtual keyboard as well as buttons to shift the default octave of the notes you are playing.
The Instrument Editor also gives you the ability to modify the sustain of your sample, add vibrato, adjust panning, and shape a note's volume and panning behaviour (per keypress rather than for the instrument as a whole).
Navigation
Navigating along the tracks (“channels”, in tracker terminology) can be done with the up and down arrow keys (for moving from tick to tick), and left and right to move along the columns within each channel.
Tab moves from channel to channel.
As you'd expect, the Backspace key removes the note above your current line.
The Return key plays your song from the top, and Alt-Space stops playback.
There are many, many more commands but those are the essentials. A full list is available in the Milkytracker Manual.
Recording
For a note to be recorded, you must enter recording mode.
As is often the case with sequencers, there are two recording modes in Milkytracker: live recording and step entry.
Both modes are activated with the same keyboard shortcut: the Spacebar. Alternately, click the Rec button in the top control panel.
Live Recording
For live, on-the-fly recording, press the Spacebar to arm recording, and then press the Play Sng button (located just above Channel 1 column). There's no count-in, so you may or may not want to build one in for yourself. Either way, the song loops forever until you stop recording, so if you miss a measure you can punch it in on the next pass.
Step Entry
You don't have to try to keep up with the computer when entering notes. Once you're in record mode, you can press the Up or Down arrows to move from tick to tick and then press whatever note you want to have played there. It's very common to see a tracker at work using nothing but the Q-U and A-M keys with the left hand and the arrow keys and a few extras with the right. This style of work is similar, in some ways, to the hardware drum machines and sequencers that were used before computers were commonplace in the studio.
Playback
To hear your composition at any time, press Enter (or Return, on some keyboards) to start playback. There are three variants of the play command but two that matter in context of this tutorial:
- Enter plays the song
- Shift-Enter plays from cursor position
To stop playback, use Alt-Spacebar.
MIDI Data
As you enter notes into your fledgling song, you may notice that in each channel column there are several smaller columns, each represented by a dot (.) when empty. These columns contain the MIDI data being sent along with each tick.
- The first triplet is the note and octave. For example: C-5 or A#6, and so.
- The second column represents the instrument number. If you have three instruments defined in a project, then 01 through 03 are valid entries (note that the 0 character gets replaced by a dot in single-digit numbers). The default value for this column is whatever instrument and sample is selected in the panels at the top.
- The third position is the volume of the note. 00 through 40 are valid (they correspond to hex values).
- The final triplet holds effect values (pitch bend, vibrato, portamento, and so on). A full list of effect codes is available in the Milkytracker Manual.
Saving
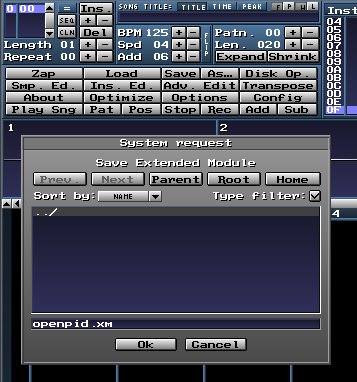
To save your work, in case you want to stop tracking and come back to it later, just click the Save or As… buttons in the top control panel.
Export
To export your song so that not everyone has to know how to use a music tracker to listen to your work, you can have Milkytracker export to a .wav files. Convert to ogg with oggenc or sox, or to mp3 with lame, and so on.
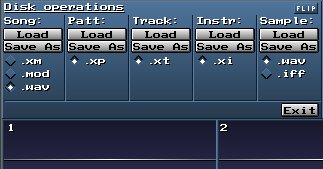
To export, click the Disk Op. button in the control panel to open the Disk Op. panel.
In the Song section, put a tick in the box by .wav and then click Save As.
In the dialogue box that appears, save your file to your home directory (or ~/Music, or whatever is appropriate).
Modular Milk
As long as you installed it with JACK support, you're free to pipe Milkytracker through JACK. With JACK, you gain the synchronise with other MIDI instruments and tools like Calf for effects and Jamin and JACK Capture for mastering.
Documentation
The official documentation for Milkytracker is located at http://milkytracker.org/docs/MilkyTracker.html. It's a useful resource, but it does tend to assume that the reader is already familiar with music trackers. There are some videos online showing how to use Milkytracker. Otherwise, this tutorial itself should have you composing with an afternoon; combine that with a in-app exploration and you should be a pro within a few weeks.
See Also
schismtracker
seq24
Linux Sampler
