Natron
Natron is a node-based compositor.
Strengths [Weaknesses]
Non-Destructive
Node-based compositing is popular because it allows for major image manipulation with no enforced chain of dependency. You can rotoscope and resize and re-colour an image, and then remove any of those nodes without affecting the effect of the others. It's a powerful system used in most professional FX packages like Blender.
OpenFX
Natron benefits from several open technologies and open standards, not the least of which is OpenFX. OpenFX-compliant effects, both open and closed-source, from several companies and open projects are compatible with Natron.
Professional
Natron uses several professional, industry-standard technologies on its backend, including OpenColorIO and OpenCV. It fits right in to established industry pipelines.
Python API
Natron has a full Python API so anyone familiar with Python can create new effects and functions.
Weaknesses [Strengths]
Not A Clone
The usual warning about open source projects not being discount versions of famous closed source applications applies. Natron is a dedicated compositing application that is very similar to closed source applications that do, basically, the same job, but it's not a carbon copy of them. Comp artists will be frustrated if they attempt to use Natron as a copy of other applications in the VFX field.
Young
Natron is a fairly young application yet. While it is in use at several active production houses, it has yet to prove itself as a long-term reliable solution.
Install
To use Natron at its fullest potential, you should have OpenColorIO and OpenCV (both available from http://slackbuilds.org installed. These are not strictly necessary, so if you just looking at Natron, it will still launch, but for actual work you probably want these technologies installed and active.
To a budding or working comp artist, even Natron's install will be familiar. Download Natron and run the executable. It runs an install “wizard” prompting you for an install location and offering an automatic download of various optional components.
The install can happen in two different ways:
- Run the installer as a normal user and install to a location in your home directory (somewhere in
~/binis customary; for instance,~/bin/natron) - Run the installer from a terminal using the
kdesucommand and install to a systemwide location, (/optis customary)
Basic Compositing
Compositing is both a science and an art, but the user mechanics of Natron don't take long to pick up. There are not many tutorials online on the subject, but there are plenty of online tutorials on similar products, and the information and demo assets are surprisingly compatible.
The term “composite” literally means “something made up of disparate parts”. In the context of visual effects, this refers to anything from overlaying text on top of video to taking a 3d-modeled troll and placing it next to a campfire that was shot in the real world. Both tasks require at least taking two separate images, dropping garbage that is not needed in a frame, combining the two images, and integrating them.
To begin with, practise making download the Slackermedia logo from the front page of http://slackermedia.info and save it to your hard drive in a sensible location. The full path to the image is http://slackermedia.info/images/bigskull.png
$ wget http://slackermedia.info/images/bigskull.png
Launch Natron from the K Menu or from a terminal.
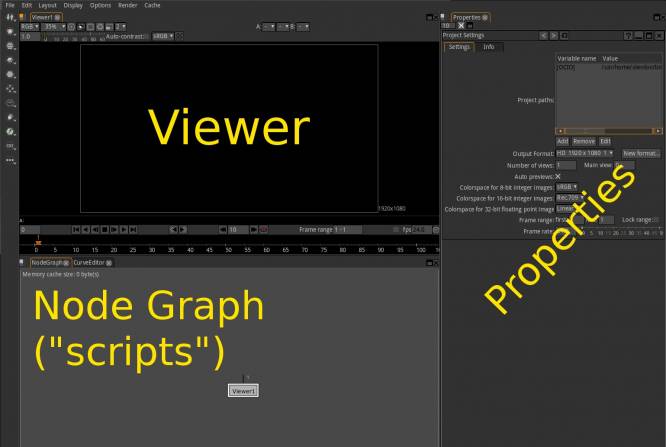
- The top left of the Natron window is a viewer.
- The bottom left is the Node Graph (called a “script panel” by most compers).
- The right half of the Natron window is the Properties panel.
In the Project Settings panel in the Properties area, set the colorspace if that is important to you (for this demo, it is not). Set the Frame Range from its current default value of 1 - 1 to 1 - 24. Set the Frame Rate to 12 or so (only because this is a demo and full specs are not required).
To import a movie or image sequence or, in this case, a single image, into Natron, right-click any where in the Node Graph area and select Image → Read, or just press the r key on your keyboard whilst your mouse cursor is with the bounds of the Node Graph.
Once the image is in your workspace, it may not show up in the viewer (depending on how you imported it) because it is not connected to the viewer. Click on the arrow head on the bottom edge of the Read image node and drag your mouse cursor over to the Viewer1 node. After you release the mouse button, an arrow appears between the nodes, and the image appears in your viewer window.
Natron sets your viewer size to the size of the first image you import. In the Project Settings panel in the Properties area, set the Output Format to a reasonable demo frame size. Since this is just a demo, a small frame size might be better, so set it to PAL unless you want to stress-test your computer to see what it can handle.
Everything is a Node
In Natron, nearly everything is a node. If you are experienced with GIMP or Synfig, then whatever your impulse might be to do in either of those applications can be translated to finding a node in Natron to do the same job. It's not always a direct translation, but it's a good place to start.
With the Slackermedia logo in your workspace, add some text:
- Right-click in the Node Graph window.
- Select Draw → TuttleText.
- In the Text field of the Tuttle Text properties panel, type a string. Set the font size and font to something you can easily see.
- Set Colour to white and Background Colour to black.
If you connect the TuttleText node to the Viewer1 node, the text takes over the viewer and it's all you see. You lose the logo, even though both are being fed to the viewer.
That's where the compositing comes in; to see two layers together, you must composite them together:
Right-click in the Node Graph window.
Select Merge → Merge.
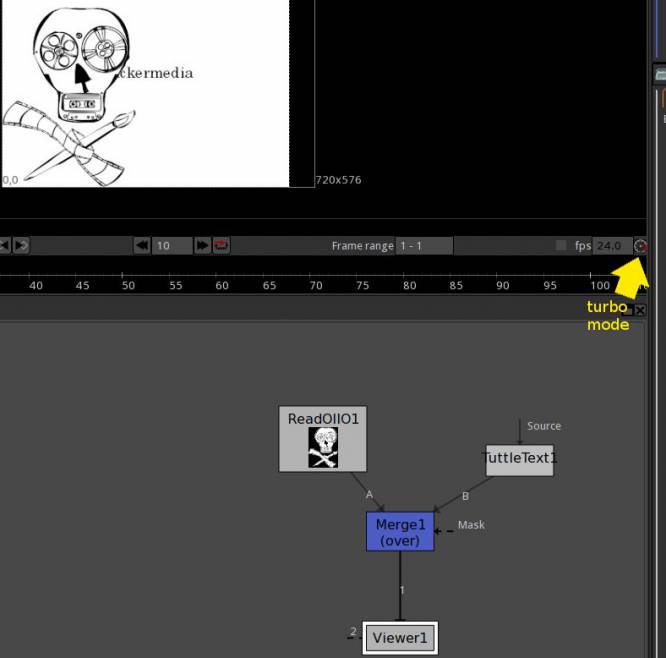
Connect the image node to the A input of the merge node.
Connect the text node to the B input of the merge node.
Connect the merge node to the viewer.
If the viewer does not update properly, turn on Turbo Mode by clicking the rightmost button in the Timeline strip between the viewer window and Node Graph. This requires more RAM but if you have it, use it. If all else fails, disconnect the viewer and then re-connect it (more commonly known as “unplug it, and plug it back in again”).
The two images are now composited together. The default merge is an over composite. There are several different types of compositing, and sometimes they go by slightly different names in different programmes, but the principles are always the same.
Change the merge composite type in the Merge1 properties panel.
In this demo, the source material is black and white, so all of the composite modes are basically binary in this case; everything is multiplied or added to absolute values. In most composites, this is not the case. If you want to see more realistic composite examples, try bringing in a photo or video of your own and see how it reacts to text or another image.
Basic Animation
Natron would be an over-complex version of GIMP were it not for the fact that it composites pictures that move. Since most of the pictures in Natron will be moving, it's not unusual for the elements you are using to composite them together to have to move.
Currently, the Slackermedia logo and the text in the demo composite are static. Anything that has a keyframe button  next to it can be animated, and there are several additional nodes that add more animate-able properties to your assets.
To animate something in Natron, use keyframes. The keyframe buttons are located in the Property Panels.]:
- Make sure the playhead is at frame 1 by using the play controls along the timeline.
- In the TuttleText property panel, click the keyframe button and select Set Key (All Dimensions. This creates a new keyframe; in the timeline, the playhead turns blue.
- Move the project playhead to frame 16 (or some frame later in time), and click the keyframe button again to set a new keyframe.
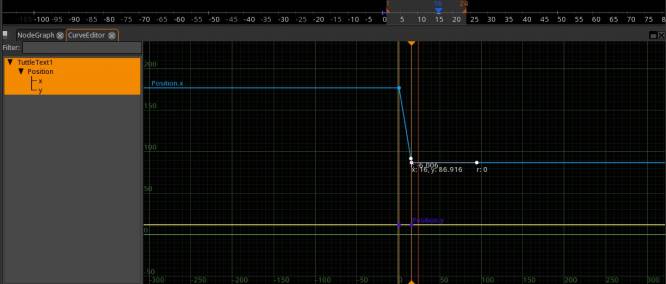
- You have two keyframes, but no motion between the two points in time. The easiest way to tween in Natron is the Curve Editor window, which is a tab behind the Node Graph window. If there is no Curve Editor tab, click the Layout button to the left of the Node Graph tab and select Curve editor here.
- Switch to the Curve Editor window and locate the lines that represent the X and Y positions. As in Blender, use the mouse wheel (or the scroll function1 on your touchpad) to zoom in and out. Middle-mouse click to move around in the Curve Editor.
- Grab onto the keyframe markers in the Curve Editor to change the values of the TuttleText node in whatever way you want your animation to occur. For instance, try moving the text from right to left.
When you're finished your animation, send the playhead back to the start and press play.
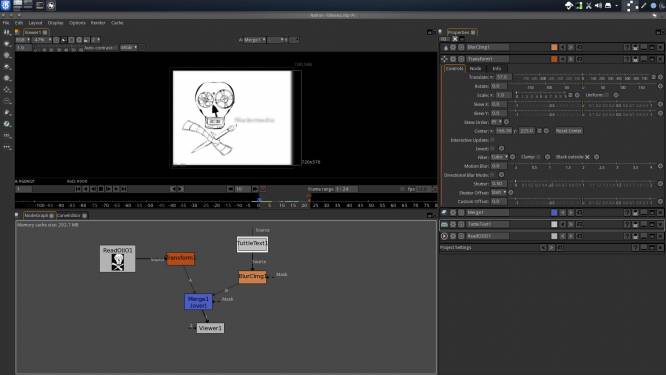
Not all assets have handy position markers built in the way TuttleText does. You can add properties, like position, crop, size, rotation, and so on, by adding more nodes to your script. For example, to add a transform node:
- Click the Slackermedia logo node in the Node Graph window.
- Right-click anywhere in the Node Graph window.
- Select Transform → Transform. A transform node appears inline directly after the selected node.
- Click the transform node in the Node Graph window.
- In the Transform property panel, change the position, skew, scale, rotation (and more).
As with any property panel, anything with a keyframe button can be animated.
Example Composite Task
Slightly more advanced is the ubiquitous green screen effect. For this, you need sample footage. Sample footage abounds online, but much of what you find online is heavily compressed, which by definition discards information. For a clean green screen, the less compressed your footage, the better.
The Internet has quite a lot of sample greenscreen footage. If you cannot find any that suits, download sample footage from this online mirror.
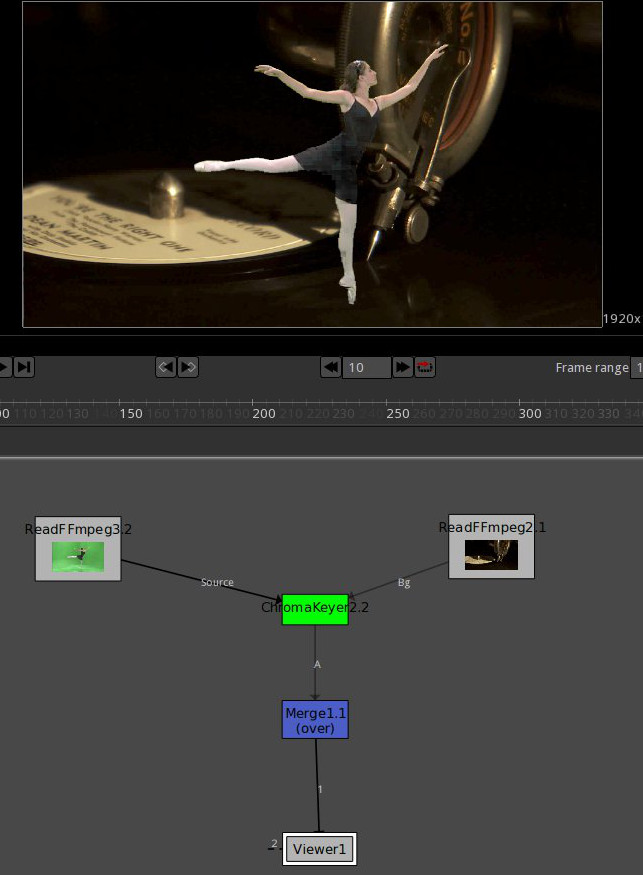
- Add a greenscreen shot with a Read node (
ron your keyboard, or a right-click anywhere in the Node Graph window). - Add a background shot, also with a Read node (
ron your keyboard, or a right-click anywhere in the Node Graph window). - Add the “greenscreen effect”, more technically known as a chroma key, from Keyer → ChromaKeyer.
- Connect the greenscreen node to the chromakeyer source.
- Connect the background node to the chromakeyer background.
- Connect the output of the Chromakeyer node to the Viewer node.
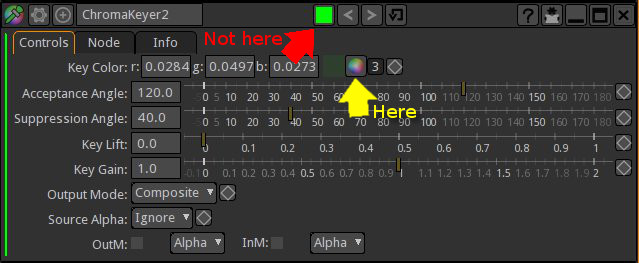
Use the color picker in the Chromakeyer properties panel (use the color picker in the panel not the title bar of the panel. The title bar colour picker is for the visual appearance of the node in your scripts area, it has no affect on the actual function of the node.
Once you have a good chroma key, you'll see it in your viewer.
To get a feel for how flexible Natron is, and how a little extra effort in compositing can render improved results, add a little style to the setup:
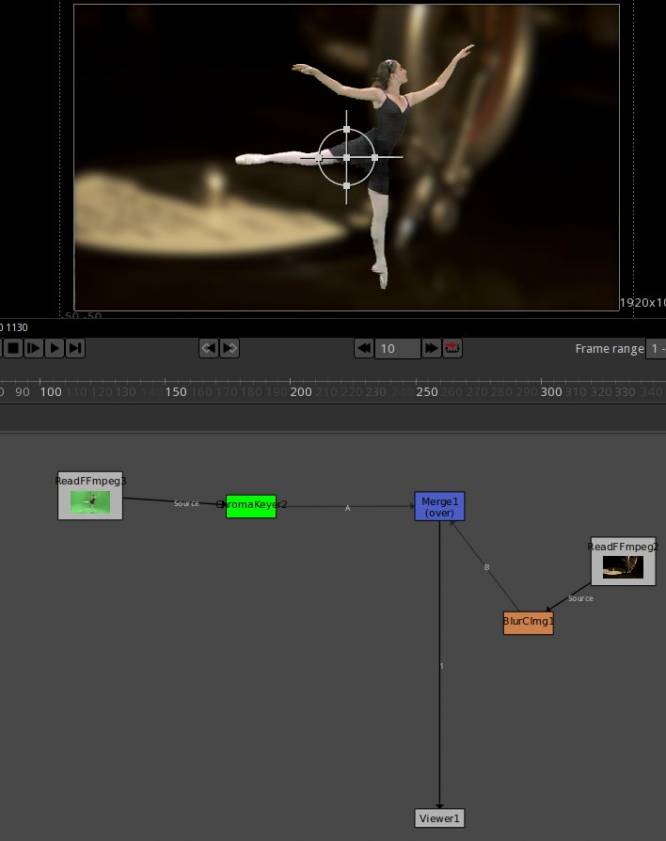
- Add a Merge node to the Node Graph window.
- Connect the output of the ChromaKeyer to the
Aside of the Merge node. - Add an Filters → BlurCImg1 node after your background image, and disconnect the background (or the blur) from the ChromaKeyer. By freeing the background from the chroma key process, you add flexibility to how you can process the output of the keyer.
- Connect the blur node to the B side of the Merge node.
- Connect the Merge node to the Viewer.
- In the BlurCImg1 property panel, increase the blur amount until the background gets a “soft focus” look.
Now you have a scene with the suggestion of depth-of-field at best, or a de-emphasis on any clutter at worst.
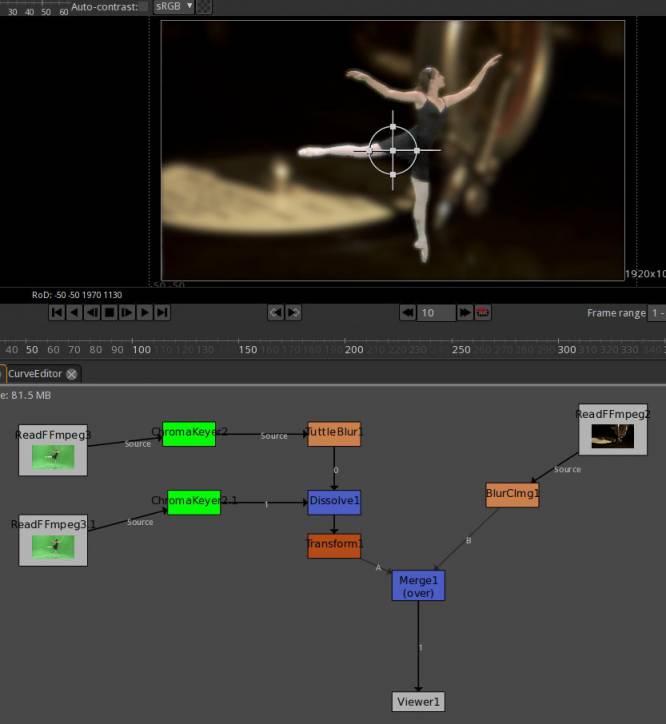
In this example, the ballerina in the shot is still a little rough around the edges. There are several ways to deal with that issue, but in this case an artificial glow to suggest stage lighting is what the client is looking for. This is a good example of how output can be doubled up on itself to produce a unique effect.
- Without removing any nodes or connections, click and drag to select Read and Chromakeyer nodes. Right-click on your selection and choose Edit → Duplicate Nodes.
- Move the duplicated nodes to the side so you can work with them.
- Add a Merge → Dissolve node.
- Connect the new Chromakeyer output to the Dissolve node.
- Add a Filter → Tuttle Blur node and connect it to the Dissolve node.
- Now disconnect the original Chromakeyer from the Merge node and re-connect it into your new Dissolve node.
- Connect the Dissolve node to the Merge node.
- In the TuttleBlur properties panel, increase the blur amount just enough so that an outer glow appears around the subject.
Were this an actual deliverable shot, you would apply colour correction and probably an additional transform to position the subject, and so on. There are plenty of effects and nodes available to help a composite reach its best possible quality, and the best way to learn them is to experiment.
The important lesson here is the segmentation technique; rather than hooking all nodes into a central Merge node, the script keeps individual effects in their own subroutines, which are then finally connected to a Merge just above the final viewer. That's not always how a composite will go, but it's important to keep in mind that few scripts are just three or four nodes, and fewer still are linear.
Documentation
Natron is still a young project. There is a surfeit of documentation on Natron proper, but the compositing principles and even the kind of effects it uses are well documented. The Foundry's Nuke tutorials even have free downloadable example assets that you can use in Natron, so look around online if you are not familiar with node-based compositing; with a little translation, you can learn everything you need to know.
