Blender
Blender is a powerful application that can be used for 3d modeling, graphics, motion graphics, compositing, special effects, game design, and quite a lot more. It is very actively developed, with new features arriving often. Blender is not just in use by movie studios, tv stations, and independent artists around the world, but by the Blender Foundation itself, which produces short films on a regular basis, adding features to the application based directly upon artist needs. Blender is by no means an academic exercise; it is a serious tool for serious production.
Strengths [Weaknesses]
Powerful
Full-featured and mature, capable of nearly anything.
Stable
Quality code that takes reliability seriously.
Efficient
A finely-tuned user interface for fast and fluid control.
Flexible
Rich Python API allows for user customisation.
Weaknesses [Strengths]
Complex
There is a learning curve that some people consider steep.
Misunderstood
Because it is powerful, people often praise it for things that it can technically do, even though it may not be the best application for that task. Alternately, people do not understand what it does.
Install
There are pre-compiled binaries available on the http://blender.org site (with easy installation possible from http://slackbuilds.org) for 32-bit and 64-bit systems. Blender is rapidly developed, and yet the releases are quite stable, so there is probably no harm in checking the site before installing to ensure that you are getting the latest version.
The precompiled binaries from http://blender.org force you to use the bundled version
of ffmpeg, which may or may not be the best version of ffmpeg for your needs.
For most people, the pre-compiled version of Blender is suitable, but if you want to use your own custom compiled version of ffmpeg, you must compile Blender from source code. It is sensible to start with a pre-compiled version of Blender and then “upgrade” to a custom version only if you find the need to do so.
When installing from slackbuilds.org, Blender is installed to /opt, a standard
non-standard location. This will not effect how Blender works or even how you
interact with it, but it could effect how you install plugins (especially if you are
maintaining a system for multiple users).
Compiling from Source
If you need to compile from source so that you can compile against your own version of ffmpeg, or for any other reason, you can do that, usually without much added effort.
The compilation process of Blender is not as complex as it might seem at first glance over its developer documentation. On a default Slackware system, most of Blender's dependencies are already installed and there is no need for “development” versions of libraries as the dev docs list for distributions like Fedora or Ubuntu.
Most online docs assume that you do not have development libraries installed; keep in mind that you are on Slackware, so there is no separate “dev” package. As long as you install (or already have installed, in many cases) the dependencies, Blender will compile.
Install Python3 from [http://slackbuilds.org]]. It is safe to have both the default Python2.x and Python3 installed on your Slackware system.
Download the source code from http://blender.org. The development team offers a stable release tarball as well as the development code from svn; a true Slackware multimediatician will use the stable release.
Untar the downloaded archive and cd into it:
$ tar -xzf blender-x.y.tar.gz
$ cd blender-x.y
Create an isolated destination directory so that a Slackware package can be created:
mkdir /tmp/blender
Invoke the build script, redirecting the output to the temporary build location:
$ scons install destdir=/tmp/blender
Create a Slackware package and install:
$ cd /tmp/blender
$ su -c 'makepkg -l y -c n /tmp/blender-x.yy-`uname -m`-1_SMi.tgz'
$ su -c 'installpkg /tmp/blender*1_SMi.tgz'
Unexpected errors are common enough to warrant a note about them. Blender is frequently developed, and building it from source will sometimes render a puzzling error. Chances are, of course, that someone before you has experienced the same error, so simply do an internet search on the error in order to find a solution or work-around.
For best results, search the internet for the exact error that you receive, such as:
yasm: FATAL: unable to open include file `nasm.inc'
Searching for very specific errors often return existing issues and their solutions. Whether it's a bug or simply something that you overlooked when preparing for the compile, the answers are often a simple matter of installing another dependency or commenting out a bad line of code. Errors do happen, but they needn't dissuade you from compiling important applications from source.
Blender Plugins
No small part of Blender's power comes from the wealth of plugins available for it, both for free and for sale. Sites like http://cgcookiemarkets.com/blender and http://blendernpr.org/store provide amazing tools at reasonable rates, and the site http://blenderaddonlist.blogspot.com tracks as many independent and free addons it possibly can.
There are plugin sets that turn Blender into a nearly full-featured video editor, adds Maya-style “pie menus”, provides sculpting brushes, a quick-access asset library, and much more. You have only to identify your need and then search for a plugin that resolves it.
Read a plugin's documentation to find out how to install it, but usually the steps are these:
- Download the plugin and unzip or untar it.
- Read the plugin documentation for install and usage instructions.
- In Blender, navigate to the User Preferences panel.
- In the User Preferences window, click the Addons tab.
- Click the Install From File… button in the User Preferences panel.
- Once installed, search for the addon by name or category.
- Click to place a tick mark in the Enable an addon box on the far right of the plugin list entry.
The plugin is now active.
Some plugins only appear in certain Screen layouts, and many of them are quite complex because they add so much functionality, so you may need to research how to use the plugin. Do some tutorials or read the docs, and then get to work.
Renderers
Blender ships with two renderers: the aptly named Blender Render and the newer Cycles. Both of these render engines are production quality, but the exciting new features are going into Cycles. The best way to get to know a renderer, from a user and artist perspective, is to spend time with it; render as often as you can, experimenting with settings, lighting, and time. Find out how the renderer works, what its strengths are, where it is slow or rough, and become fluent with it.
Blender, ever flexible, is not constrained to only its two bundled renderers. There are many more renderers out there, and as long as they are Linux-compatible and have a Blender plugin, they are trivial to install and use.
At least four additional free 3d render engines are available along with Blender plugins to integrate them as seamlessly as Blender Render and Cycles, straight from http://slackbuilds.org:
- povray (Blender already includes an exporter plugin for POVray, but it requires activation in the User Preferences > Addons panel.
- mitsuba (the Blender plugin is located in the mitubsa-blender package)
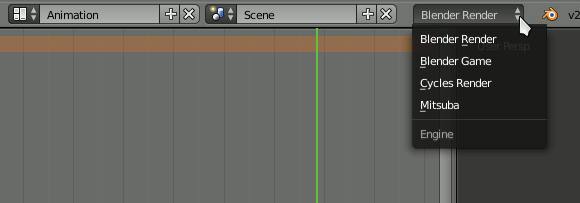
In each case, whether you had to install the Blender plugin separately or whether it was bundled, you must go to User Preferences > Addons and activate the renderer just as you would any other plugin.
Once installed and activated, change which render engine you are using from the Render Engine menu located in the Info panel.
Blender Crash Course
3d graphics is a complex subject, and the applications that generate them can be intimidating. A full course on Blender is out of scope for this article, but sometimes the hardest part of getting started with a new application are the first few steps. This “crash course” demonstrates how to generate some CGI objects, texture them, and then render the shot (a still image or animation) to disk.
Learning 3d applications is more than just learning the application; it's also learning the way that 3d on a 2d surface is implemented. In order to complete this quickstart, you should have some basic 3d experience. If you are completely new to the genre, start with something even more basic than this. The initial episodes of http://www.youtube.com/watch?v=7FBoegkgIho are particularly recommended.
When you launch Blender, you get one gray cube for free. It brings along with it some default texturing and material presets, so delete it for now just so you can start completely fresh.
To delete an object, right-click the object and press the x key on your keyboard.
In Blender, the location of your mouse cursor affects what happens when a key is pressed. If your mouse cursor is hovering over the cube object and you press x, then the cube is deleted, but if your mouse is hovering over a random menu or panel and you press x, probably nothing at all will happen. Always be aware of where your cursor is.
Working with 3d Objects
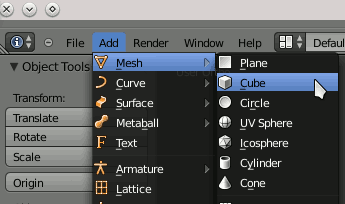
Add a new cube. To add an object, place your mouse cursor in the 3d viewport of Blender (the main window, where the first cube was located before you deleted it) and press the spacebar and type “Add Cube”, or use the menu Add > Mesh > Cube
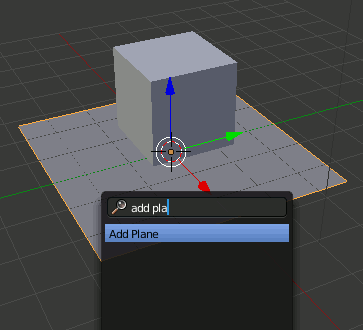
Also add a plane for this exercise. To add a plane, press the spacebar and type “Add Plane”, or use the menu Add > Plane
Scale (resize) the plane and move the cube so that the cube sits on the plane with enough of a “ground” for reflections and fancy effects like that. To scale an object, hover your mouse cursor over the object and press the s key on your keyboard. To grab onto things and move them, press the g key on your keyboard.
To release an object in Blender, left-click.
It often helps to move objects either by number or by axis:
- To move by axis, press g and then x (or y or z, depending on which axis you want to move along). Defining an axis immediately after a transform key (such as g for grab, s for scale, or r for rotate) constrains all motion along that axis).
- To move objects by numbers, press n to birng up the properties panel. Use the X, Y, and Z fields to manipulate the location and size of the cube.
The Camera Object
When you are rendering something, you are transferring it from 3d space into 2d space. So you always render from the point-of-view of a camera.
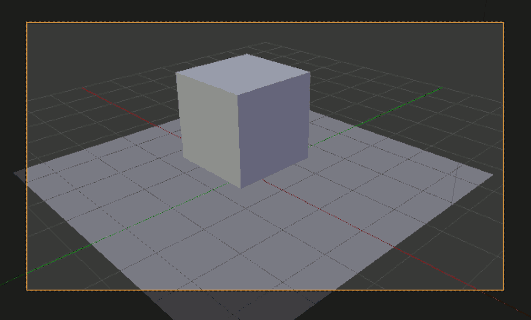
By default, you have one camera in your viewport. You can grab it and move it around just as you can any other object. To actually see through its lens so you know what you will see in your final render, press the 0 on your number pad. To get back to normal (“perspective”) view, press 5 on your number pad.
Lighting
The fact that you can see anything at all in your Blender workspace is only because there's an imaginary worklight on, but that worklight will not render. It's just a worklight, it's not on your virtual set.
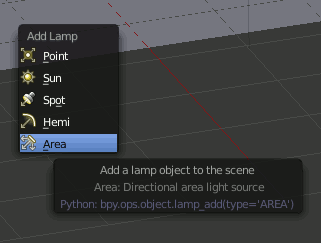
To add a lamp, press the spacebar and type “add lamp”, or use the menu Add > Lamp > Area.
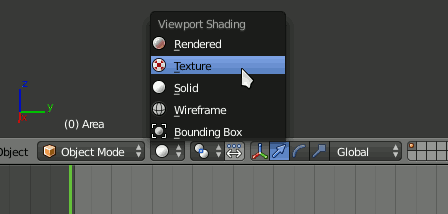
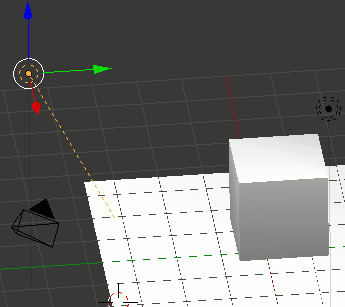
Like 3d objects and cameras, you can grab and move a lamp, but you might notice that it is difficult to light a shot when there is no indication what affect a lamp has on your scene. To see a preview of what your scene looks like under different lighting situations, switch your Blender viewport into Texture shading: click the Display pop-up menu at the bottom of your viewport pane.
Now if you move your light around your workspace, you should be able to see a better indication of what effect it will have upon your scene.
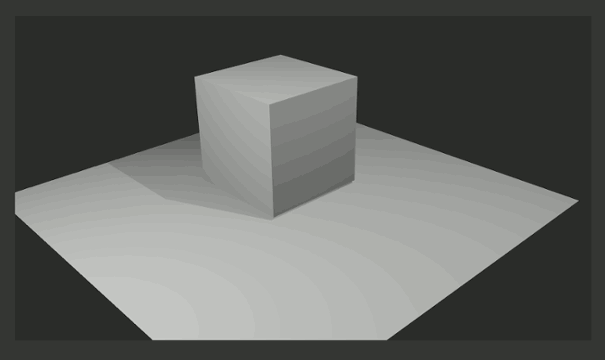
To see what you have so far, do a single-frame render. Press F12, or use the menu Render > Render Image in the top menu bar of the Blender window.
Press Escape to exit the render view.
Textures, Materials, and Maps
Texturing works differently, in Blender, for polygonal objects and vector shapes, so the process will be different on the cube and the plane.
All objects in Blender, however, need a material. Without having a defined material, an object is immaterial; there isn't really an equivalent in the real world, but you might imagine that everything you create in Blender is made of old, dull clay until you give it a material.
Remember: you cannot texture an object that has no material. You cannot UV map an object that has no material. Think of any object in Blender that has no material as immaterial, like the lamps and the camera; they have no material and likewise cannot be textured by you.
Material
First add a material to the plane object.
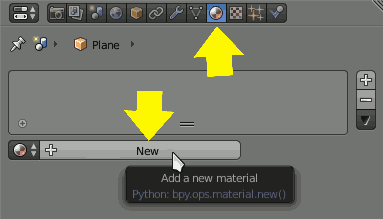
Right-click on the plane to select it, and then click on the Material tab of the Properties panel.
Click the New button to create a new material and assign it to your plane.
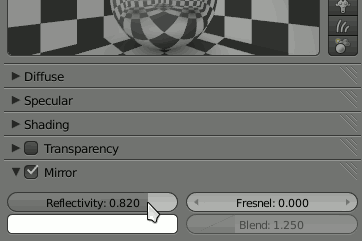
Once your plane is “made” of something, or else has a “tangible” shell around it (if you prefer), make it reflective, like a mirror. Activate the Mirror attribute in the Material tab and raise the reflectivity to 0.8 or so.
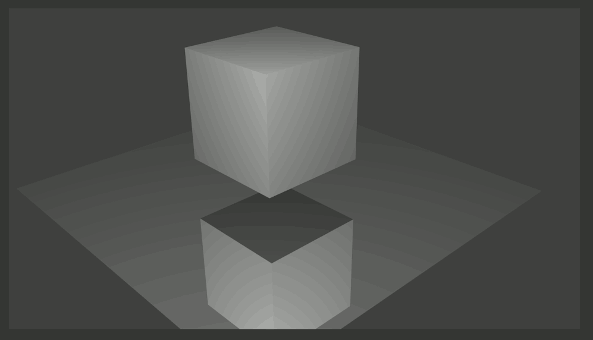
Perform a test render and notice that the plane is now reflecting the cube.
Press Escape to exit the render screen.
Apply a basic texture to your cube before continuing. Don't make it reflective or anything fancy, since you are going to use it as a target for a UV map.
Texture
A texture is a pattern or algorithmically generated image that is “painted” onto a material. In this example, we will use the generic textures that come bundled with Blender.
To create a new texture for your cube, click the Texture tab in the Properties panel.
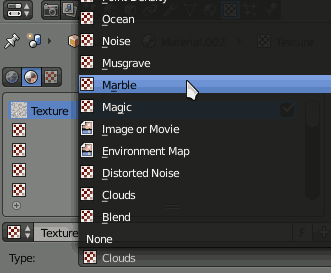
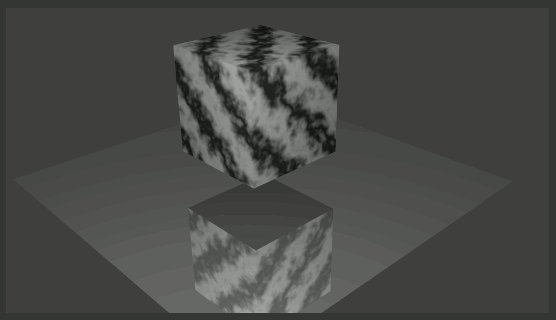
By default, the texture applied to your cube will be a cloud pattern. Feel free to try out other patterns found in the Type pop-up menu.
Perform a test render and notice that the texture is not only applied to the cube, but is accurately reflected in the plane.
UV Map
UV Mapping is a common trick in texture departments and is often used in video games because it's fast to render. They are also fairly fast to create since a UV map contains no 3d data itself; it's actually a 2d image “projected” onto a 3d object. This is why, if you play any 3d games, you might notice that while an old well-worn wooden cabin door looks very realistic when it is far away, if you get too close to it, it starts to look very pixelated and 2 dimensional.
UV mapping can get very detailed, because you can project 2d images onto very complex 3d surfaces, and you can even use colour information within the projected image to provide pseudo-3d depth.
To perform simple UV mapping, make sure you are still in the Texture tab on the Properties panel.
In the Texture tab, deactivate the texture that is currently on your cube, and then click the New button to create an empty texture slot.
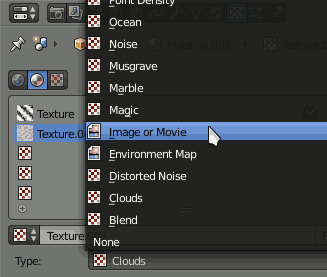
To assign an image to the texture, click on the Type pop-up menu and select Image or Movie.
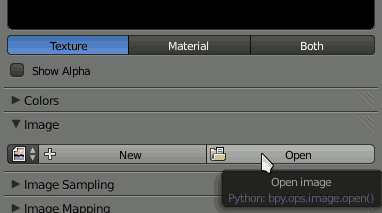
Scroll down as needed to the Image section of the Properties panel and click the Open button.
Upon clicking Open, the main panel of Blender becomes a file browser. Find an image and select it. There are many sites online that feature free textures, so you may find some nice images that way, but for now any image will do.
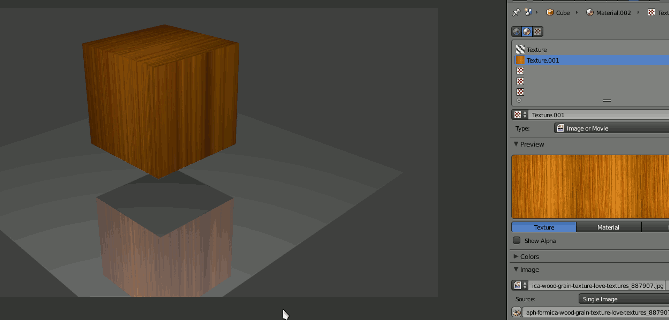
You can adjust the mapping of your image in the Mapping section of Properties but for now, do a render and notice how the image has been stretched around the cube.
There are far more detailed methods of doing a UV Map, whereby a 3d object is split at the “seam” and the image is designed to wrap gracefully around the object. But for now, let's leave this as is and continue with the crash course.
Rendering Multiple Frames
So far, we have only rendered a single frame. You may be a single-frame artist but frequently when working in Blender it's to do animation. Let's do a simple animation and then render out the array of rendered images.
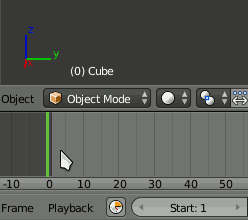
First, make sure you are on frame 1 (by default, you are). You can enter a frame manually in the number field at the bottom of the screen (just to the right of the End field), or drag the playhead to frame 1.
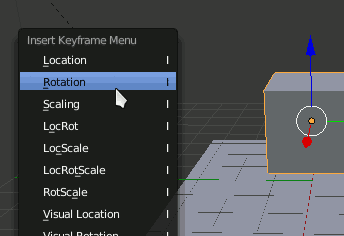
Right-click on the cube object and then press the i button on your keyboard to insert a keyframe. Choose the Rotation keyframe from the contextual menu that appears.
Using the Timeline panel, advance 99 frames ahead.
Using the Timeline panel, advance 99 frames ahead.
Rotate the cube as close to 360 degrees as convenient. To rotate an object, right-click the object to select it, and then press r and then z (remember, the z constrains the rotation to the z-axis).
Press i again to insert a second rotation keyframe.
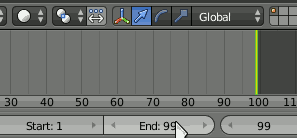
After you have rotated the cube, change the End value in the Timeline panel to 99. This will make it so that you are only rendering the 99 frames you actually need for your complete animation, rather than the default 250.
If you were to press F12 at this point, you would only get a single frame rendered. Rendering an animation is, essentially, doing that 99 times; the end result is 99 still images. That is the default method of animation and VFX; still images are rendered to disk, and then imported into a video editor (which usually see image sequences as makeshift movie files).
The default location for rendered frames is /tmp which is fine for temporary work but it's better to change the destination location to a directory in an actual working directory.
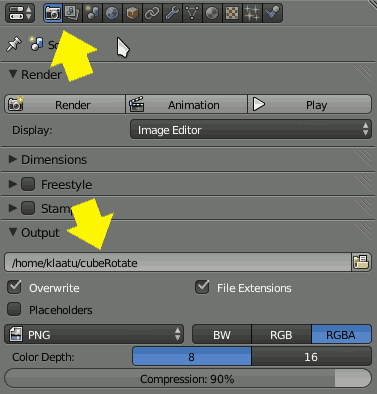
To set your render attributes, click the Render tab in the Properties panel.
Scroll down to the Output section of the Render tab and click the folder icon to define a location for your rendered frames.
Navigate to the Render menu in the top menu of the Blender window and select Render Animation.
Once the animation has rendered, find the rendered images in the directory you defined as the target destination for your animated sequence. You might use ffmpeg to string these together or play them back, but Blender has an inbuilt animation player.
Click the Render menu at the top of the Blender window and select Play Rendered Animation or just press Control+F11 on your keyboard.
That's the basics of a mere subset of the features in Blender. While everything covered has been very basic, this workflow is close, in a very simplified form, to the usual 3d workflow; model, texture, animate, render. Practise those steps and develop each one as you learn more and become more skilled, and you will be making great 3d animations and rigs in no time.
Blender as a Video Editor
TL;DR
Blender is not [yet] the pro video editor you're looking for.
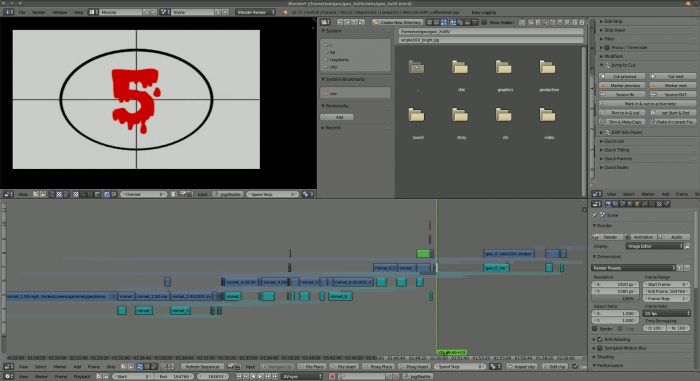
Blender as a 3d modeling application and as an animation tool is, unsurprisingly, commonplace, but there are those who use Blender primarily as a video editing tool. This use case appears to be more popular among Linux users, so it warrants some special attention here.
There are several reasons to turn to Blender for non-linear video editing:
- Blender is a carefully-written stable application designed to handle complex matrices and simulated physics. It makes sense that it can handle video gracefully.
- The Blender user interface is ultra-efficient, and if you know how to use it then you will find its trademark hybrid of keyboard and mouse interaction just as efficient for moving video around a timeline as it is with 3d sculpting.
- If you are working in a mixed-platform environment, Blender's ability to run on all of them could prove to be a major advantage. In terms of video editing, it is one of the few cross-platform solutions available.
Allowing for the fact that one editor's advantage is another editor's disadvantage, Blender does have some significant drawbacks as an NLE, as well:
- Blender cannot mix frame rates. If you have some clips at 25 fps and some clips at 50 fps, you must convert them on your own, outside of Blender.
- Blender lacks conveniences, such as copying attributes of filters applied to video clips, that makes colour grading so easy on other video editors.
- Blender has no concept of track-types, and no way of muting or hiding entire tracks.
- Blender's video export options are limited and can be unreliable (for example, losing frame rate settings, incorrect video-to-video compositing when filters are involved) in extremely long-form edits. If you are editing more than 20 minutes of footage, you should break your project into multiple smaller Blender files and then concatenate the edits together outside of Blender.
- There is no multi-threaded rendering of video exports (other types of exports have it, but not when the source is video), so exporting video can take far longer than exporting from
Kdenliveor similar, by orders of magnitude (an hour of heavily edited and graded footace can take days).
Those are technical concerns, but additionally there are pragmatic concerns that an experienced video editor may have:
- Since Blender started life as a 3d modeling application, it is not as finely tuned toward video editing as a longtime video editor might desire. Blender devs are adding native features and users are creating plugins to help create a more NLE-centric environment within Blender, so the situation is only improving.
- It's not a carbon copy of any editing environment and probably never will be. It's never a good idea to expect or even, arguably, request for an open source clone of a closed source application that you just so happen to be very good at, but it's common for people moving to open source to desire just that: familiarity. Blender is probably never going to be a traditional video editor, so adapting to it and the way it does edit video is a must, if you intend to edit video on it.
- The workflow tends to be marvelously efficient when an action has a direct analogy to a 3d process (moving clips, deleting clips), but when there are totally unique functions introduced by a plugin, they are frequently menu- or button- oriented, with no keyboard shortcuts. Compared to the rest of Blender, this feels out of place and can bring your editing pace to an almost grinding halt.
The good news is that Blender itself, and most of its features and plugins, are all open source, so you can add functionality yourself, or wait for someone else to add it; as more people start to use Blender for everyday video editing, the more fluid it will become.
Some pertinent video editing addons are these:
- Easy Logging creates a workspace that uses the File Browser window as a video bin, and adds buttons to allow editing of clips prior to importing them into the video sequence editor. This plugin, more or less, provides three-point editing.
- Audition adds the ability to preview a clip from the File Browser before importing it into your project. It is intended as an extension of Easy Logging.
- Jump to Cut enables the playhead to jump from a strip's in- or out- points, and also adds in some convenience trimming functions. This plugin provides, more or less, the most common and basic timeline features of an NLE.
- VSE Quick Functions provides all the little convenience functions for timeline editing that any NLE would normally have (snapping, muting, locking, parenting or grouping, quick fades, quick titles) plus a few that others do not have (sorting by position in timeline or clip title or clip length).
- Extra_Sequencer_Actions adds advanced trimming functions to the VSE, including ripple deletes, ripple cuts, insert edits, slides, and more.
- VSE Transform Tools adds basic motion graphic capabilities to the VSE. Using this tool set, you are able to grab onto the video display itself and resize and re-position it within the frame. With it, you can achieve common effects such as picture-in-picture, split screen, and basic tween-based animation.
Install these plugins, and any other that appeals to your needs, and you will have a fairly robust and flexible, albeit somewhat un-even in backend and convenience features, video editing environment for short form video.
To be clear: Blender is not yet suited as a general-purpose, production editor. Its situation has improved over the past 6 years but it has serious limitations. If you are seeking a dedicated and professional video editor with all the features you expect from a professional video editing suite, Kdenlive or Lightworks are the answers.
See Also
MakeHuman
Kdenlive
Lightworks
Natron
Synfig Studio
misuba
luxrender
Yafaray
For more information, read the section on Render Farming.
