Non
Non is a suite of tools loosely bound together because they were designed by the same person, and are meant to not go together (or rather, they are meant to remain modular and independent from one another). The Non suite includes a timeline, a sequencer, mixer, and session manager.
Strengths [Weaknesses]
Modular
If you just need a mixer, then you can launch the Non mixer and use it. If you just need a session manager, you can use Non Session Manager. Non is a set of independent tools, and they are meant to be used in whatever mixture of audio tools that happens to work best for you.
Weaknesses [Strengths]
Modular
Keeping things modular is wildly liberating for some and horrifying to others. If you prefer an all-in-one DAW that manages everything for you and keeps all of your settings and tools organised for you, then Non will not fit your workflow. Use a proper DAW, not a non-DAW.
Install
Install Non from http://slackbuilds.org.
Usage
Non calls itself a “non DAW” because while it is a suite of tools that you would normally find in a DAW, each tool is a stand-alone application that can be launched and used on its own. For most, the major appeal of Non is its modularity; you can use one or two Non tools, or you can use them all, and in both cases you can use all of the other Linux audio tools as well.
There are four major user-facing components.
Non-Session-Manager
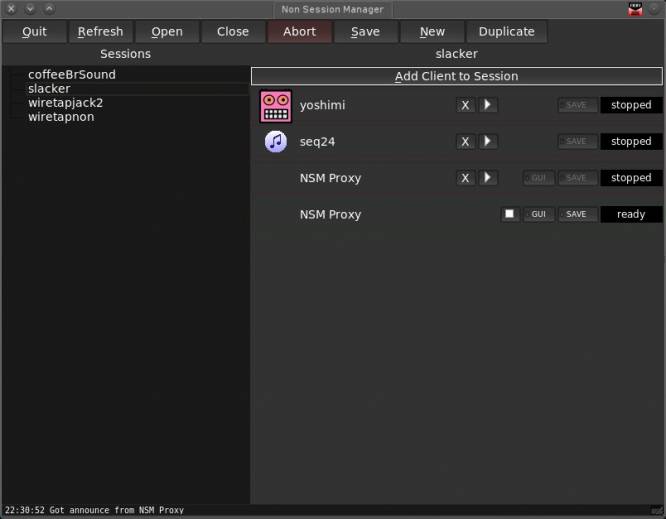
The most popular of the Non tools is the Non Session Manager, a modular yet global audio project session manager. With the Non Session Manager, you can instantiate a “session” and enter each tool that you use within your project. Non Session Manager remembers each tool and the JACK state of each tool.
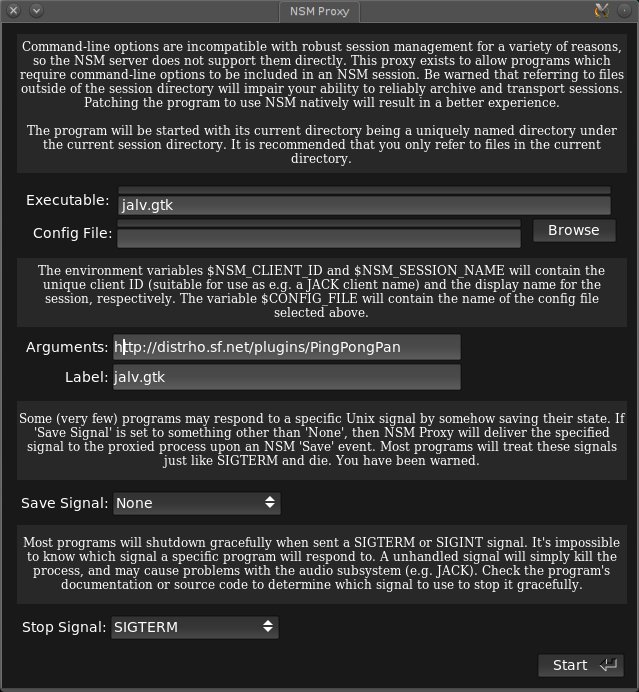
It does not, at least directly, remember the internal state of each tool, nor does it allow launching an application with arguments (such as yoshimi -l ~/path/to/config or jalv.gtk $(lv2ls | grep -i pingpong). For advanced configurations such as these, an NSM Proxy must be created.
To add an instrument to a session, click the Add Client to Session button along the top of the Session Manager. For a standard instrument or filter, just enter the name of the executable just as you would launch it from a terminal. For an instrument requiring a proxy, enter the name and argument into the text field; you'll be prompted to break this out into separate fields.
NSM (non-session-manager) is possibly the most developed component of the Non tool set, and it's perfectly acceptable to to use it and no other Non tool. NSM doesn't care what else it gets used with, it just does its very best to keep track of the tools that you use.
Not everything can be tracked by Non Session Manager, so you still need to save session files and presets and patches yourself. You may organise this information in whatever way works best for you (Slackermedia recommends its own Planter tool for results), and you might be able to have NSM load the configuration files through a proxy command. The actual saving and organising, however, is still up to you.
Non-Mixer
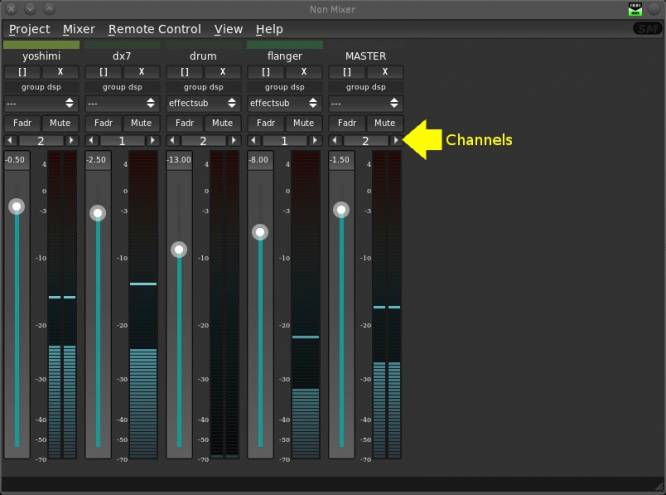
Non Mixer is a modular mixer; launch it, add channels, and route it with JACK. After Non Session Manager, this is probably the most developed tool of the NSM suite, and depending on your setup, could be a key component in your modular studio.
If you are using modular JACK tools, you most likely do not have a mixer in your pipeline. You might control volumes with internal controls on a per-instrument basis, but sometimes you want a little extra intervention so you can control your mix. Non Mixer is exactly that.
Launch Non Mixer from the K Menu or from a terminal as non-mixer.
The initial Non Mixer window is empty. Press A on your keyboard to add a channel (you might think of a channel as a “track”). All new tracks are mono by default; change it to stereo with the channel count as needed.
For each track that you add to your mixer window, a new one appears in JACK. Using either QJackCtl or Patchage, route your signals as needed.
Control
The missing feature here is automation; it is possible to control Non Mixer through MIDI signals, so you could sequence MIDI just to control the mixer. Or you might set the mixer levels statically, but use the internal controls of a modular instrument to modify its volume when required. Or you might record everything as separate tracks and mix them later in a DAW (or Non DAW) with automation.
Non-Timeline
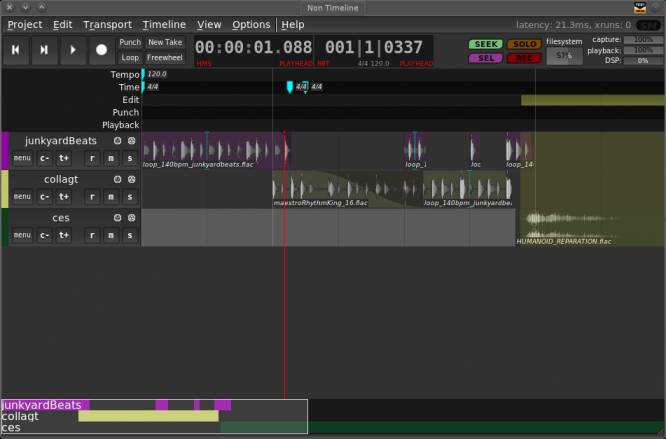
Non Timeline is the audio DAW in the Non suite. It does audio sequencing; it does not do MIDI sequencing, it does not do waveform editing.
Launch Non-Timeline from the K menu or from a terminal with the non-timeline command.
It will not prompt you for one, but in order for Non-Timeline to work, you must create a new project first. Create a new project in Project → New.
The term “project” is confusing here, because Non Timeline actually only wants a directory into which it can place a sources directory. The directory containing sources acts as a Non Timeline “project”. When you re-open a project, this becomes very noticeable, since you will likely frantically search for a proper project file. There is none. Just click the Open button when you see the sources directory, and Non Timeline will know what to do.
The Non Timeline interface is pretty minimal to the point that it doesn't even have a menu option for importing sound files. To import a sound file into your project, first create a track to house the audio file; either right-click in the Timeline window and select Add audio track or press the A key on your keyboard. Once a track exists, drag-and-drop an audio file from your file manager into the Timeline.
Control
A peculiar feature of Non Timeline is that, unlike many other applications in both the film and audio world, the focus of workspace actions are not the playhead (or audio “transport”) but the mouse cursor.
Cut (Split) Audio
To cut an audio region, place your mouse cursor at the position you want to splice. Press the S key on your keyboard. The audio region has been split at the point of your cursor.
Fades
Fade audio in or out with F3 or F4 respectively. The position of the mouse cursor starts the curve of the fade.
Navigation
Navigating the Non Timeline is mostly done with the audio transport. Playing forward or backward obviously navigates in realtime, while the arrow keys scroll horizontally through the timeline independently of the transport. Shift right and shift left moves the transport left and right.
The Non Timeline feels very much like a souped-up tape recorder. It does not feature the fine-grained editing capabilities that you might be used to with Audacity or even qtractor or Ardour. It seems to be geared toward capturing the live performance of a musician who anticipates punching in to correct errors, and who is satisfied with the performance as an input method. It sounds strange to qualify this, but in the age of electronic music, many composers expect their Timeline to let them make all kinds of changes, and Non Timeline is not geared toward that. It's a recorder.
Non Sequencer
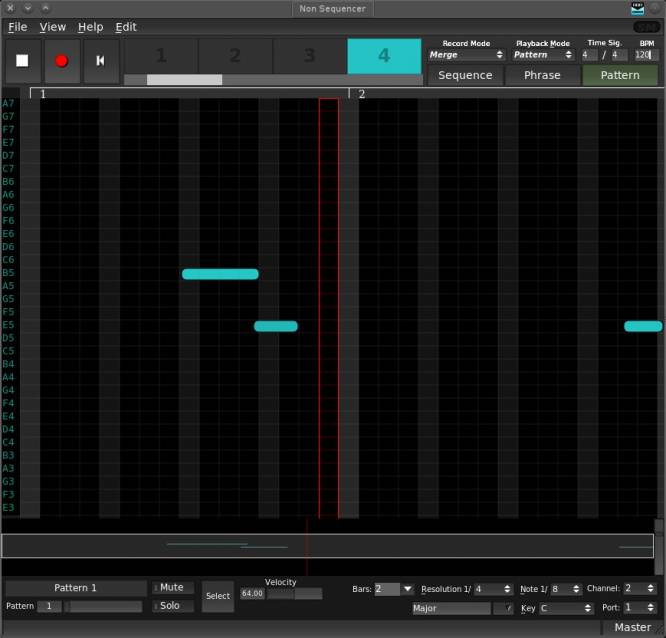
The Non Sequencer is the MIDI sequencer in the Non suite.
The sequencer itself has three workspaces; the sequence editor, the phrase editor, and the sequencer.
The sequencer workspace is a mostly traditional MIDI sequencer, with the x-axis representing time and the y-axis the chromatic scale. Play or manually enter notes into the “piano roll” to compose.
Routing
The routing of MIDI gets a little tricky if you don't keep track of where the signal filters are. In Non Sequencer, there are two MIDI signal settings:
- Channel: What MIDI channel the sequencer is broadcasting.
- Port: Which MIDI port in JACK the signal is being sent from.
It's easiest explained as an example:
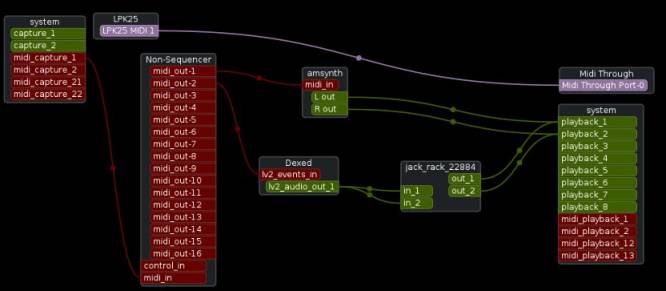
Route a MIDI controller into the computer as usual: plug the controller into USB, and then in JACK send the output of that controller to the System MIDI Thru so that MIDI permeates through the JACK system.
Send the System MIDI Capture 1 signal to the MIDI In of Non Sequencer. This sends all MIDI channels (rather, omni channels) from the controller to the Sequencer.
Launch AmSynth as your first instrument.
Send the Sequencer MIDI Out 1 into the AmSynth MIDI In port, and AmSynth's audio to your System Playback. Now when you play your controller, you hear AmSynth.
Press the Record button in the Sequencer and play some notes into the sequence. When satisfied, stop recording. Note that the default record mode of the Sequencer is Merge, which adds any new notes that you play into the sequence, essentially overdubbing over itself each time it plays (like on an MC-303 and most other hardware sequencers).
In the lower right corner of the sequencer, the Channel and Port are both set to 1.
This means that although omni MIDI channels are being fed into the sequencer, the current pattern is sending only channel 1 over port 1.
Now add a second synth (for instance, a dx7 emulator).
Send the sequencer's MIDI Out 2 into the DX7's In.
Press A to Add a new pattern into the Sequencer. To flip back and forth between patterns, use [ and ]. Do not use the Pattern Slider in the bottom control panel; it sometimes works but mostly just over-shoots what you are trying to do.
In the synth, set its active MIDI channel to 2. Where you set this will depend on the synth (and some synths will not even have the setting available to you, but the really good ones do).
In the Sequencer, also set the Channel to 2 and the Port to 2.
To hear what you are about to play, route a cable from System MIDI Capture 1 (this is where all USB controller traffic is happening) to your new synth's MIDI In.
All MIDI signals are sent to the sequencer, and that helps you drive the instruments. But once the Sequencer takes over driving the instruments (when it is playing a sequence), the only channels that leave it are the ones you dictate in the Channel and Port settings.
Phrases and Sequences
For whatever reason, Non Sequencer works backwards along the top toolbar; you begin with sequences to create the difference patterns you want each instrument to play. Then you move one to the left to Phrase, where you define which sequence should play during one particular phrase. As with the Sequencer workspace, add new phrases with A and move between them with [ and ]''.
To sequence phrases, move to the Sequence workspace. Add phrases with the Insert Phrase button; all existing phrases are listed there.
Non Sequencer may not be the most robust or flexible sequencer or component of Non, but then again, it works well enough for small projects, and its minimalism and simplicity may appeal to you.
See Also
Ardour
Qtractor
MusE
Rosegarden
Seq24
Aj-snapshot
