Fonts
Fonts are vital to creativity and good design. Slackware comes packaged with a respectable variety of fonts, including the Red Hat set of Liberation Fonts to act as drop-in replacements for fonts like Helvetica and Times, which are useful but a little bland. There are a number of sources for more fanciful free fonts available; all you have to do is find them, and then install them.
Where can you find free fonts? Glad you asked.
SlackBuilds.org
First, look on http://slackbuilds.org. Do a search for “font” and you will find a number of installable packages of free fonts, including the Ubuntu set, Droid from the Android project, Courier Prime, and some others. These are nice and complete fonts; not the most exciting, but they do at least deviate a little from the 5 or 6 core font faces that we are all used to.
League of Moveable Type
Next, the League of Moveable Type features open source, glyph complete, free fonts. Most of the fonts here are quite pleasant to look at, and sleek enough to be identified as artistic but still maintain a professional veneer.
Fedora Linux
You will also find quite a few font packages available from the Fedora Linux
repositories. Fedora has long been considered to have on of the finest graphic
design teams (lead by designer Maírín Duffy) of any Linux distributions, and also dedicated to freely licensed content, so pillaging their repositories for .rpm files is useful. With rpm2tgz, it's easy to do; take any .rpm from an official Fedora repository and turn it into a Slackware package and then use installpkg to install.
The official Fedora package index is located at http://pkgs.fedoraproject.org/repo/pkgs/. Search for “font” and see what's available.
# rpm2tgz ttf-foo-font-1.0.rpm
# installpkg ttf-foo-font-1.0.t?z
Multimedia Sprints
If it's quantity and variety that you seek, the Great Linux Multimedia Sprints feature over 2455 free fonts to use and re-distribute. Some of these fonts are not entirely glyph-complete, so you may not want to use them as your system font, but for artistic use this is a must-have collection. The sprint collections contain all the kinds of fonts you would expect from a major purchase, including gothic, script, calligraphy, distorted, graffiti, and so on. All are royalty-free and most are very creative.
Your Personal Collection
Last but not least, you can use any font you already own. There is nothing prohibiting you from installing your existing collection (or fonts you find on the internet) of ttf and otf fonts.
Installing Fonts
Generally speaking, there are two different philosophies on installing fonts:
- Install fonts on a systemwide basis so that all users of a computer has access to them
- Install fonts on a per-user basis
Traditionally, installing fonts systemwide made most sense: it was economical on disk space and it made sure all users had access to the same fonts for design work. This is still true if you actually manage a multi-user system but if you are an independent artist with no other users to consider, the multi-user aspect is unimportant. In fact, there is a distinct advantage to installing fonts on a per-user basis in such a case, since it makes keeping track of those fonts and porting them or syncing them over to another computer a lot easier.
Manually Installing Fonts as User
To install fonts into a user's home folder, place a font file into a directory (it may or may not yet exist) ~/.local/share/fonts.
Traditionally, you would also run this command:
$ fc-cache -f
Although in practise, most modern GUI applications auto-detect new fonts when they are launched and the font cache updates when you reboot, so the command is not strictly necessary for most things you will be doing with fonts.
To install a font that has been packaged up by someone else (from Fedora or Slackbuilds.org, for instance) then the package's default behaviour will be to install the font to the system. To override that behaviour, treat the package as exactly what it is: a tarball (archive). Instead of installing the package, just un-tar it and move the ttf or otf files to your personal fonts folder. You can do this in the GUI or in the shell.
Since the ~/.local/share/fonts directory is hidden, it can be difficult to access from Dolphin. There are several ways to access a hidden directory from Dolphin but the easiest is to press alt . (that's the Alt key and a dot) to reveal all hidden folders, and then navigate to ~/.local/share/fonts.
In the shell, you can extract just the ttf files and move them to the appropriate font directory:
$ tar tvf ttf-foo-font-1.0.tgz | egrep .tf$ | rev | cut -f -d' ' | rev

ttf-foo-font-1.0
ttf-foo-font-1.0/README
ttf-foo-font-1.0/LICENSE
ttf-foo-font-1.0/otf
ttf-foo-font-1.0/otf/foo.otf
ttf-foo-font-1.0/otf/foo bold.otf
ttf-foo-font-1.0/ttf
ttf-foo-font-1.0/ttf/foo bold.ttf
ttf-foo-font-1.0/ttf/foo.ttf

$ tar xf ttf*foo*tgz foo.ttf > ~/.local/share/fonts/f/foo.ttf
$ tar xf ttf*foo*tgz foo\ bold.ttf > ~/.local/share/fonts/f/foo_bold.ttf
The advantage to this is that ~/.local/share/fonts is located in your home directory, which is, presumably, the directory you most often backup, and it is certainly the
directory you will take with you if you get a new computer. In both cases, your
font collection is sure to go with you.
You can take your fonts with you if you install them to the system, too, but in that case you do have to remember to take them, since they don't just get pulled along with the rest of your personal data. It's not impossible, it just has the potential of being forgotten.
Manually Installing Fonts for All Users
To install fonts on a system-wide basis, the font files should be copied to /usr/share/fonts/foo where foo is the type of font (usually TTF or OTF).
Since this affects all users on the system, it must be done as root or with reboot privileges:
$ su -c 'cp foo.ttf /usr/share/fonts/TTF/'
$ cd /usr/share/fonts/TTF
$ su
# enter root password
# mkfontscale .
# mkfontdir .
# /usr/bin/fc-cache -f
Installing Fonts via KDE
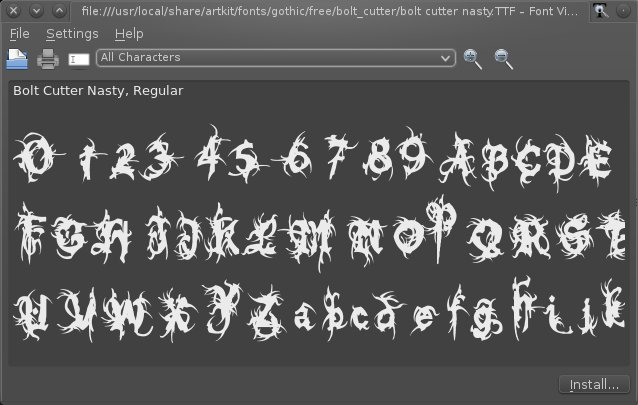
If you are running KDE, you may use KDE's Font Viewer (which automatically
launches when you click a font file in Dolphin). Font Viewer shows a preview of
all the glyphs in the font set and even allows you to enter your own preview text.
To install the font, click the Install button in the lower right corner
of the window. Enter the root password to install the font system-wide, or
choose to install it for only the current user.
Font Previews
Font files by default have a unified, generic icon. To instead set the icon to a two-letter sample of what the font looks like:
- Click the Configure (a gear or a spanner, depending on your icon theme), and selecte Configure Dolphin.
- Click the General tab in the left column.
- Click the Preview tab.
- Activate previews for font files in the Preview list and click OK.
Font Management
Most applications scan the font directories every time they launch, so keeping hundreds of fonts in your font directory may make applications slow to load. It may, therefore, behoove you to familiarise yourself with the fonts you own, and only install fonts you actually want on your system.
Of course with 2455+ fonts available on your system, familiarising yourself with all of your possible fonts is a tall order. There are two popular font managers for Linux:
KDE Font Management
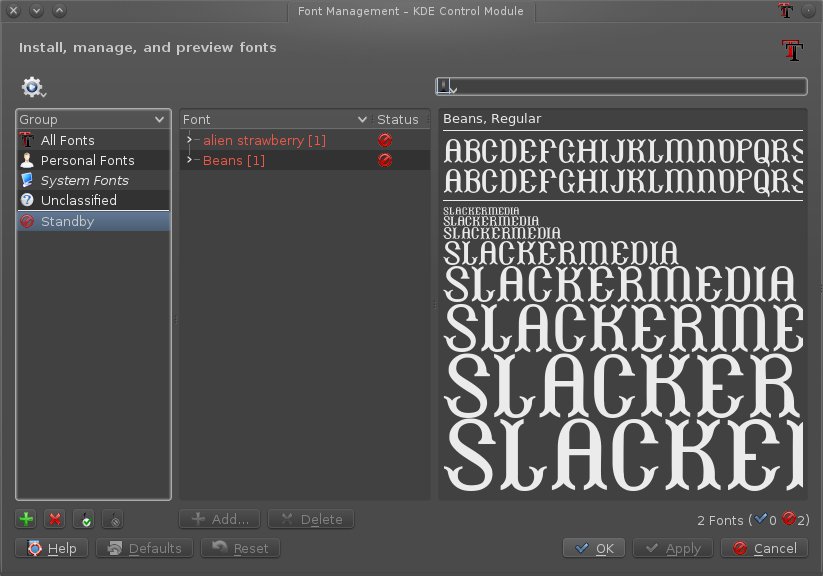
KDE includes. along with its desktop and rich set of applications. an inbuilt Font Management. With it, you can group fonts together by arbitrary classifications, and activate or deactivate fonts either individually or by group, so that applications either load or ignore them upon launch.
Font Matrix
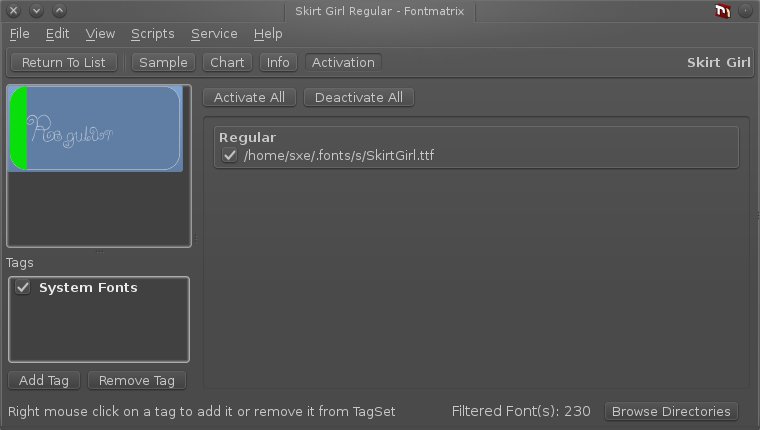
Font Matrix is stand-alone font manager available from http://slackbuilds.org, that lets you preview your fonts, tag and classify fonts, search through them by various attributes (including by submitting a screenshot sample of a font you want to match), and activate or de-activate fonts so that applications will either load or ignore them upon launch.
Tagging Fonts
To tag fonts with custom identifiers in Font Matrix:
- Select the font or fonts you want to tag in the Browse Font panel.
- With the font or fonts selected, click the Tags tab on the lower left of the Browse Font panel.
- Type a new tag into the text field and click the Add Tag button.
You can now filter all fonts on your computer with these tags by selecting a tag in the Tags menu (by default set to All activated) at the top of the Browse Fonts panel.
You cannot tag fonts in KDE Font Management but you can group fonts in collections in the left column. To add a new font group, click the green plus + button in the bottom left of the Font Management window.
Activating and Deactivating Fonts
Deactivating a font or a group of fonts prevents the applications you launch from scanning those fonts as a part of its startup process. This can increase the launch time of applications like GIMP, Scribus, Inkscape, and so on.
In Font Matrix, deactivate or activate a font by toggling the tick mark in the box next to the font's name.
In Font Management, deactivate or activate a font by right-clicking the font name or the font collection and selecting Disable or Enable.
Integrating Font Managers
The KDE Font Management application is integrated into the rest of your applications through KDE; it's always on and ready to activate or deactivate fonts at your command. If you are a frequent user of Font Management because you frequently swap out what fonts are set to be available in different applications, then you may want to make Font Management easily accessible to you by adding it to the Favourites of the K-Menu or creating a launcher for it in a desktop panel.
Because it is not an inbuilt component of your desktop, Font Matrix only dictates whether a font is active or not while it runs. If you are a graphic artist, you probably want Font Matrix to idle in the background as, essentially, an active part of your workspace:
- Click on the Edit menu > Preferences.
- Select System Tray from the left column of the Preferences window.
- Place a tick mark in the Show Font Matrix in the System Tray check box to give Font Matrix the ability to be put into the background as it runs.
- Place a tick mark in the Close to System Tray check box to prevent yourself from accidentally quitting Font Matrix. Optionally, have Font Matrix start as a System Tray item; you'll still be able to click the System Tray icon to bring up the full GUI.
- In KDE, once you've launched Font Matrix as a System Tray icon, it will launch the next time KDE is restarted. If you have customized Session settings, you can force Font Matrix to start upon KDE startup by placing a shell script in
~/.kde/Autostartor by opening System Settings and selecting Startup and Shutdown; add Font Matrix to the Autostart group.


