**This is an old revision of the document!**
Natron
Natron is a node-based compositor.
Strengths [Weaknesses]
Non-Destructive
Node-based compositing is popular because it allows for major image manipulation with no enforced chain of dependency. You can rotoscope and resize and re-colour an image, and then remove any of those nodes without affecting the effect of the others. It's a powerful system used in most professional FX packages like Blender.
OpenFX
Natron benefits from several open technologies and open standards, not the least of which is OpenFX. OpenFX-compliant effects, both open and closed-source, from several companies and open projects are compatible with Natron.
Professional
Natron uses several professional, industry-standard technologies on its backend, including OpenColorIO and OpenCV. It fits right in to established industry pipelines.
Python API
Natron has a full Python API so anyone familiar with Python can create new effects and functions.
Weaknesses [Strengths]
Not A Clone
The usual warning about open source projects not being discount versions of famous closed source applications applies. Natron is a dedicated compositing application that is very similar to closed source applications that do, basically, the same job, but it's not a carbon copy of them. Comp artists will be frustrated if they attempt to use Natron as a copy of other applications in the VFX field.
Young
Natron is a fairly young application yet. While it is in use at several active production houses, it has yet to prove itself as a long-term reliable solution.
Install
To use Natron at its fullest potential, you should have OpenColorIO and OpenCV (both available from http://slackbuilds.org installed. These are not strictly necessary, so if you just looking at Natron, it will still launch, but for actual work you probably want these technologies installed and active.
To a budding or working comp artist, even Natron's install will be familiar. Download Natron and run the executable. It runs an install “wizard” prompting you for an install location and offering an automatic download of various optional components.
The install can happen in two different ways:
- Run the installer as a normal user and install to a location in your home directory (for instance,
~/bin/natron) - Run the installer from a terminal using the
kdesucommand and install to a systemwide location, (such as/opt)
Basic Compositing
Compositing is both a science and an art, but the user mechanics of Natron don't take long to pick up. There are not many tutorials online on the subject, but there are plenty of online tutorials on similar products, and the information and demo assets are surprisingly compatible.
The term “composite” literally means “something made up of disparate parts”. In the context of visual effects, this refers to anything from overlaying text on top of video to taking a 3d-modeled troll and placing it next to a campfire that was shot in the real world. Both tasks require at least taking two separate images, dropping garbage that is not needed in a frame, combining the two images, and integrating them.
To begin with, practise making download the Slackermedia logo from the front page of http://slackermedia.info and save it to your hard drive in a sensible location. The full path to the image is http://slackermedia.info/images/bigskull.png
$ wget http://slackermedia.info/images/bigskull.png
Launch Natron.
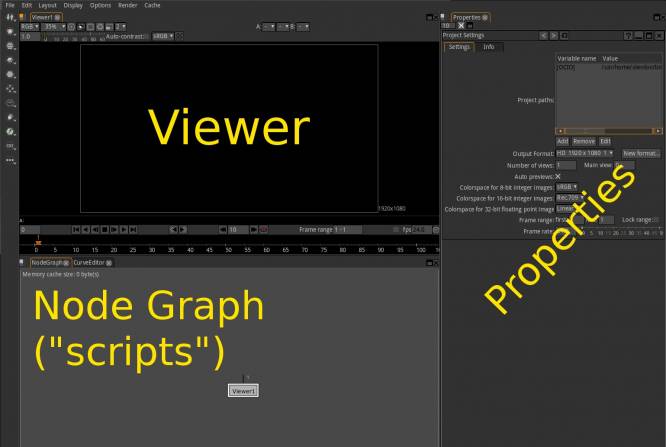
- The top left of the Natron window is a viewer.
- The bottom left is the Node Graph (called a “script panel” by most compers).
- The right half of the Natron window is the Properties panel.
The first thing to do when starting a new project is to verify your project settings. In the Project Settings panel in the Properties area, set the Output Format to a reasonable demo frame size. Since this is just a demo, a small frame size might be better, so set it to PAL unless you want to stress-test your computer to see what it can handle.
Also set the colorspace, if that is important to you (for this demo, it is not), and the Frame Range; by default it is 1 to 1, so give yourself some more time and set it to 1 to 24. Set the Frame Rate to 12 or so (only because this is a demo and full specs are not required).
To import a movie or image sequence or, in this case, a single image, into Natron, right-click any where in the Node Graph area and select Image → Read, or just press the r key on your keyboard whilst your mouse cursor is with the bounds of the Node Graph.
Once the image is in your workspace, it does not show up in the viewer because it is not connected to the viewer. Click on the Read image node and drag an imaginary arrow over to the Viewer1 node. After you release the mouse button, an arrow appears between the nodes, and the image appears in your viewer window.
Everything is a Node
In Natron, nearly everything is a node. If you are experienced with GIMP or Synfig, then whatever your impulse might be to do in either of those applications can be translated to finding a node in Natron to do the same job. Remember that, and learning Natron becomes nothing but a matter of learning a new UI.
Whether you have compositing experience or not, you no doubt see the issue with the image.
See Also
Blender
Synfig


