**This is an old revision of the document!**
Blender
Blender is a powerful application that can be used for 3d modeling, graphics, motion graphics, compositing, special effects, game design, and quite a lot more. It is very actively developed, with new features arriving often. Blender is not just in use by movie studios, tv stations, and independent artists around the world, but by the Blender Foundation itself, which produces short films on a regular basis, adding features to the application based directly upon artist needs. Blender is by no means an academic exercise; it is a serious tool for serious production.
Strengths [Weaknesses]
Powerful
Full-featured and mature, capable of nearly anything.
Stable
Quality code that takes reliability seriously.
Efficient
A finely-tuned user interface for fast and fluid control.
Flexible
Rich Python API allows for user customisation.
Weaknesses [Strengths]
Complex
There is a learning curve that some people consider steep.
Misunderstood
Because it is powerful, people often praise it for things that it can technically do, even though it may not be the best application for that task. Alternately, people do not understand what it does.
Install
There are pre-compiled binaries available on the http://blender.org site (with easy installation possible from http://slackbuilds.org) for 32-bit and 64-bit systems. Blender is rapidly developed, and yet the releases are quite stable, so there is probably no harm in checking the site before installing to ensure that you are getting the latest version.
The precompiled binaries from http://blender.org force you to use the bundled version
of ffmpeg, which may or may not be the best version of ffmpeg for your needs.
For most people, the pre-compiled version of Blender is suitable, but if you want to use your own custom compiled version of ffmpeg, you must compile Blender from source code. It is sensible to start with a pre-compiled version of Blender and then “upgrade” to a custom version only if you find the need to do so.
When installing from slackbuilds.org, Blender is installed to /opt, a standard
non-standard location. This will not effect how Blender works or even how you
interact with it, but it could effect how you install plugins (especially if you are
maintaining a system for multiple users).
Compiling from Source
If you need to compile from source so that you can compile against your own version of ffmpeg, or for any other reason, you can do that, usually without much added effort.
The compilation process of Blender is not as complex as it might seem at first glance over its developer documentation. On a default Slackware system, most of Blender's dependencies are already installed and there is no need for “development” versions of libraries as the dev docs list for distributions like Fedora or Ubuntu.
Most online docs assume that you do not have development libraries installed; keep in mind that you are on Slackware, so there is no separate “dev” package. As long as you install (or already have installed, in many cases) the dependencies, Blender will compile.
Install Python3 from [http://slackbuilds.org]]. It is safe to have both the default Python2.x and Python3 installed on your Slackware system.
Download the source code from http://blender.org. The development team offers a stable release tarball as well as the development code from svn; a true Slackware multimediatician will use the stable release.
Untar the downloaded archive and cd into it:
$ tar -xzf blender-x.y.tar.gz
$ cd blender-x.y
Create an isolated destination directory so that a Slackware package can be created:
mkdir /tmp/blender
Invoke the build script, redirecting the output to the temporary build location:
$ scons install destdir=/tmp/blender
Create a Slackware package and install:
$ cd /tmp/blender
$ su -c 'makepkg -l y -c n /tmp/blender-x.yy-`uname -m`-1_SMi.tgz'
$ su -c 'installpkg /tmp/blender*1_SMi.tgz'
Unexpected errors are common enough to warrant a note about them. Blender is frequently developed, and building it from source will sometimes render a puzzling error. Chances are, of course, that someone before you has experienced the same error, so simply do an internet search on the error in order to find a solution or work-around.
For best results, search the internet for the exact error that you receive, such as:
yasm: FATAL: unable to open include file `nasm.inc'
Searching for very specific errors often return existing issues and their solutions. Whether it's a bug or simply something that you overlooked when preparing for the compile, the answers are often a simple matter of installing another dependency or commenting out a bad line of code. Errors do happen, but they needn't dissuade you from compiling important applications from source.
Blender Plugins
No small part of Blender's power comes from the wealth of plugins available for it, both for free and for sale. Sites like http://cgcookiemarkets.com/blender and http://blendernpr.org/store provide amazing tools at reasonable rates, and the site http://blenderaddonlist.blogspot.com tracks as many independent and free addons it possibly can.
There are plugin sets that turn Blender into a nearly full-featured video editor, adds Maya-style “pie menus”, provides sculpting brushes, a quick-access asset library, and much more. You have only to identify your need and then search for a plugin that resolves it.
Read a plugin's documentation to find out how to install it, but usually the steps are these:
- Download the plugin and unzip or untar it.
- Read the plugin documentation for install and usage instructions.
- In Blender, navigate to the User Preferences panel.
- In the User Preferences window, click the Addons tab.
- Click the Install From File… button in the User Preferences panel.
- Once installed, search for the addon by name or category.
- Click to place a tick mark in the Enable an addon box on the far right of the plugin list entry.
The plugin is now active.
Some plugins only appear in certain Screen layouts, and many of them are quite complex because they add so much functionality, so you may need to research how to use the plugin. Do some tutorials or read the docs, and then get to work.
Renderers
Blender ships with two renderers: the aptly named Blender Render and the newer Cycles. Both of these render engines are production quality, but the exciting new features are going into Cycles. The best way to get to know a renderer, from a user and artist perspective, is to spend time with it; render as often as you can, experimenting with settings, lighting, and time. Find out how the renderer works, what its strengths are, where it is slow or rough, and become fluent with it.
Blender, ever flexible, is not constrained to only its two bundled renderers. There are many more renderers out there, and as long as they are Linux-compatible and have a Blender plugin, they are trivial to install and use.
At least four additional free 3d render engines are available along with Blender plugins to integrate them as seamlessly as Blender Render and Cycles, straight from http://slackbuilds.org:
- povray (Blender already includes an exporter plugin for POVray, but it requires activation in the User Preferences > Addons panel.
- mitsuba (the Blender plugin is located in the mitubsa-blender package)
In each case, whether you had to install the Blender plugin separately or whether it was bundled, you must go to User Preferences > Addons and activate the renderer just as you would any other plugin.
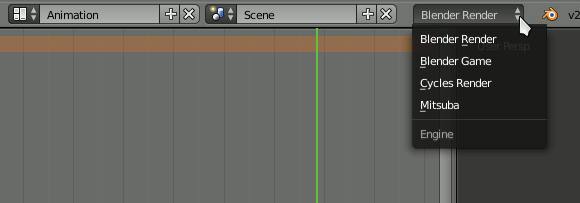
Once installed and activated, change which render engine you are using from the Render Engine menu located in the Info panel.
===== Blender Crash Course
3d graphics is a complex subject, and the applications that generate them can be intimidating. A full course on Blender is out of scope for this article, but sometimes the hardest part of getting started with a new application are the first few steps. This “crash course” demonstrates how to generate some CGI objects, texture them, and then render the shot (a still image or animation) to disk.
When you launch Blender, you get one gray cube for free. It brings along with it some default texturing and material presets, so delete it for now just so you can start completely fresh.
To delete an object, right-click the object and press the x key on your keyboard.
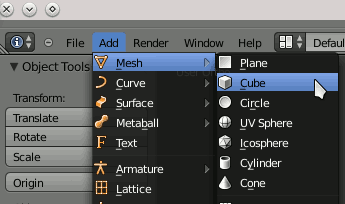
Add a new cube. To add an object, press the spacebar and type “Add Cube”, or click the Add menu and select Mesh
> **Cube**


